Configuration articles and guides for software and hardware. These settings are mandatory unless otherwise stated
v1.0.1 – 2020-03-07
Instructions for Windows and macOS users
We are using Roland JP-8000 in this guide, but this can be applied to any other synthesizer we have made the plug-in for as well.
Our focus is mostly based on Windows systems, which can not share MIDI devices between applications unless the driver is multiclient-compatible.
There are some tips and guides for masOS users as well, so be sure to read this through.
Setting MIDI Devices in Windows (simple):
If you plan to route MIDI messages from your DAW to the plug-in channel and send it to synthesizer from there, then you don’t need to read this, and you can proceed with the DAW guide that is relevant to you.
However, if you use the synth as a master keyboard in your rig or you want to delay compensate the MIDI output with the DAW, then check the advanced procedure below.
Setting MIDI Devices in Windows (advanced):
You can jump over this step, if your synthesizer is NOT used as a master keyboard in your RIG. However, we recommend adding at least one Virtual MIDI Out port for the connections.
Before we jump ahead to launch our DAW, lets do some tweaks in our system to ensure the plug-in can work with maximum efficiency. For that, we are going to need some additional tools.
- MIDI-OX for making routings behind the scenes and
- loopMIDI to create virtual MIDI ports.
We recommend installing old but trusty MIDI-OX application for Windows to make some virtual routings behind the scenes.
You can download MIDI-OX from here: http://www.midiox.com/zip/midioxse.exe
OR go to MIDI-OX website http://www.midiox.com and download the installer there.
Second application is loopMIDI by Tobias Erichsen which is perfect for creating Virtual MIDI cables inside your workstation.
You can download loopMIDI from here: https://www.tobias-erichsen.de/software/loopmidi.html
Install MIDI-OX and loopMIDI
Install both MIDI-OX and loopMIDI prior to running MIDI-OX. It is important to have both installed especially if you use a synthesizer which is used as a master keyboard in your setup!
This will allow us to clone the MIDI data from the physical MIDI interface ports to virtual ports and then later on route it inside MIDI-OX back to your DAW while the main port is assigned to the plug-in.
Example: MIDI from synth -> MOTU microLite port 1 -> MIDI-OX -> loopMIDI virtual port.
This configuration allows us to open the loopMIDI virtual port in the DAW while we use the MOTU microLite port 1 with the plug-in itself and there won’t be a crash!
Configure loopMIDI
Now that loopMIDI is installed, we can configure the ports. The reason why we are installing loopMIDI is so that we can loop back (clone) the MIDI data from the hardware MIDI port to the DAW via MIDI-OX.
This is pretty straight forward, but we will guide you through.
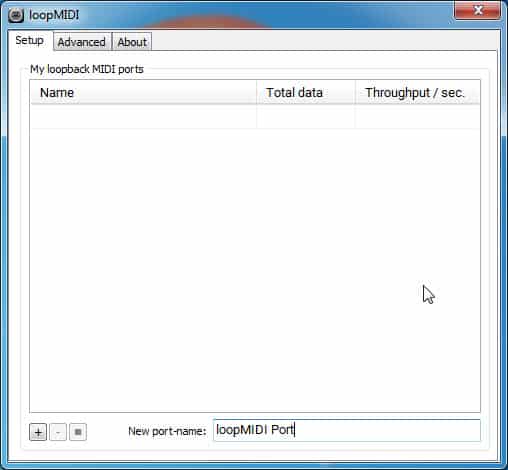
First up, open the loopMIDI settings dialog from the Windows menu bar with right click and choose Configure loopMIDI
Once loopMIDI opens up, it should look something like the image below.
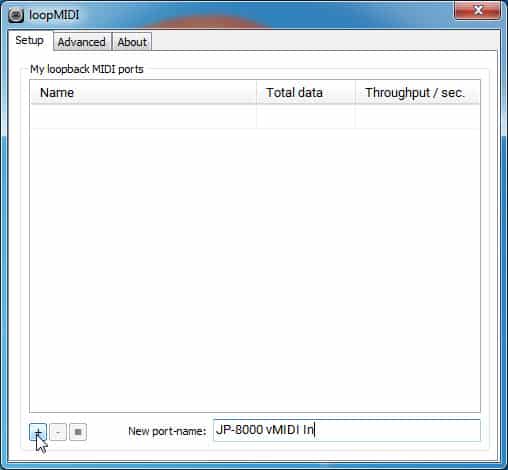
Click the New port name: field and type in your Virtual MIDI port connection name. In this example, we are going to type in “JP-8000 vMIDI In” and after that we click the + -sign to actually add it in.
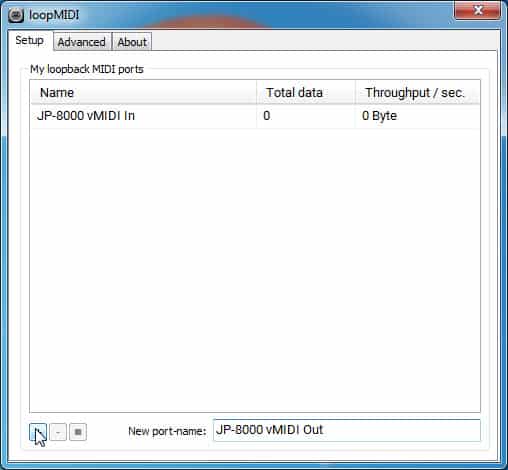
Next up we will add another port, and this is going to be called “JP-8000 vMIDI Out”. Remember to click the + -sign so it adds the port in the list.
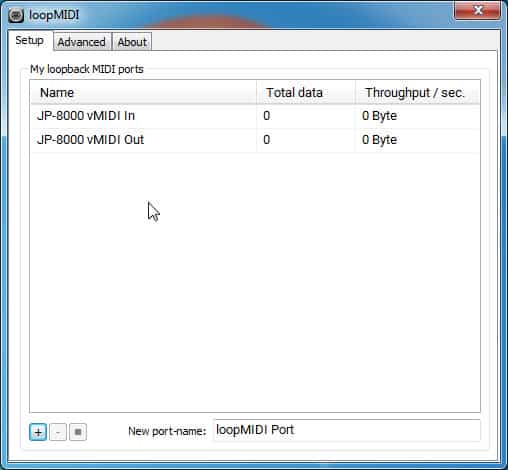
Now we have added the ports we need, so this is how it should look like!
You can now close loopMIDI window. Right click on the loopMIDI icon in the menu bar and make sure it is set to “Start minimized” and “Autostart loopMIDI” so you don’t have to worry about it during next boot.
Configure MIDI-OX
MIDI-OX is the second application needed in order to loop back the MIDI data to the DAW without crashing it. Windows will usually crash, or more importantly, your DAW will crash when you try to open the MIDI port twice within the DAW.
There are few steps to take in MIDI-OX, but it will be worth the trouble to get data passing from the synthesizer to your DAW as well as in the plug-in without crashing your session.
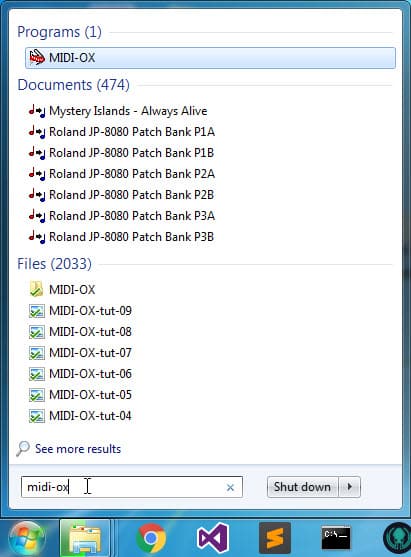
Search MIDI-OX from Windows startup menu and open it
Default view of MIDI-OX setup should look like when you first open it.
Click “View” menu item and choose “Port Routings…” This should open a blank routing sheet where we will make our connections.
After the Port Routings is opened, we need open our Physical and Virtual MIDI ports for the MIDI-OX.
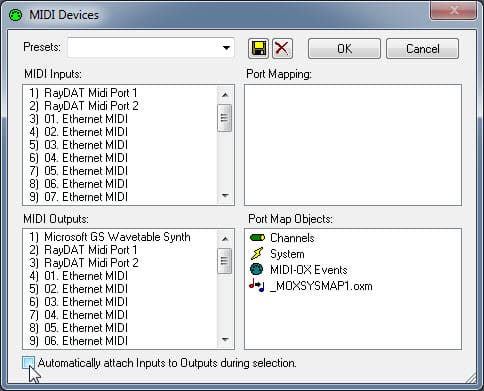
Click “Options” and then choose “MIDI Devices…”.
NOTE: There are no Input Ports and Output Ports defined yet in the MIDI Port Routing Window!
After MIDI Devices is opened up, we can see all of your Physical and Virtual MIDI ports which are in our disposal. Before selecting any ports, uncheck “Automatically attach Inputs to Outputs during selection.” or you will end up with massive connection spaghetti which isn’t what we are making here!
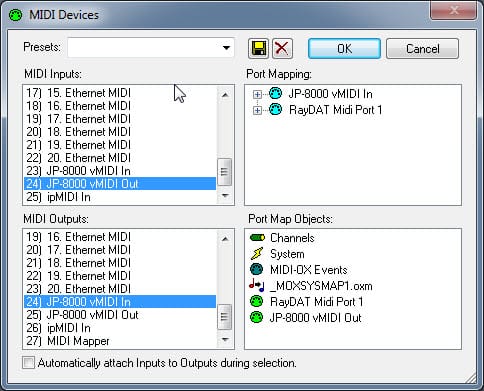
MIDI Inputs: I’ve chosen RayDAT Midi Port 1 where my JP-8000 MIDI Out is connected and loopMIDI port JP-8000 vMIDI Out.
You might wonder why it’s opposite to JP-8000 vMIDI In, but there is a reason for that. Once we do the routing in MIDIOX, the names would appear in opposite order, making it nuts to choose JP-8000 vMIDI Out in our DAW as a MIDI Input. That might not make sense at this point, but trust me, I’ve done this quite a few times now.
MIDI Outputs: I’ve chosen RayDAT Port 1 where my JP-8000 MIDI In is connected and loopMIDI port JP-8000 vMIDI In.
Same idea here with JP-8000 vMIDI In chosen at MIDI Outputs as explained above with MIDI Inputs.
Click OK after you have verified your port selections.
NOTE: Your MIDI input and MIDI output ports for your synth might be different to our example so we are only using them to refer where our JP is connected.
Once the MIDI ports are defined, MIDI-OX might automatically assign “MIDI-OX Event Port” to any of the Output Ports chosen.
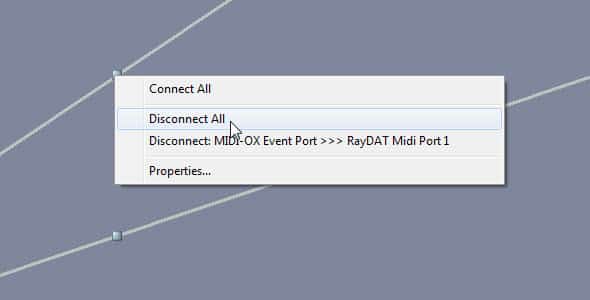
In case there are pre-made connections in the window, right click one of the gray nodes in the wire and choose “Disconnect All”. This will clear all the pre-made connections so we can start from fresh!
Drag a cable from “Input Ports” RayDAT MIDI Port 1 to “Output Ports” JP-8000 vMIDI In port.
Drag a cable from “Input Ports” JP-8000 vMIDI Out to “Output Ports” RayDAT MIDI Port 1.
NOTE: In order to establish the connection, you must drag the wire on top of the MIDI plug icon!
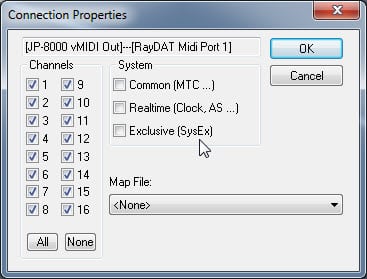
Next up, we will modify the connection type so that we will block unnecessary data flow. Right click on the gray dot at the connection to reveal the menu and choose “Properties…”
From Properties window, let’s block Common (MTC …), Realtime (Clock, AS …) and Exclusive (SysEx) message by unchecking the boxes in System section.
We simply don’t need this data unless you send realtime clock info from your DAW to the synthesizer!
Click OK to close the Properties and do the same for each connection you’ve done!
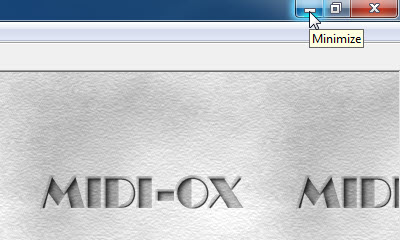
Now after all of the connections are done and we are ready to proceed, click the traffic light icon in MIDI-OX tool bar to toggle MIDI-OX in the taskbar tray.
You can now minimize the window and it will be sent to the taskbar tray.
TIP: If we are not mistaken, you should be able to add MIDI-OX in the Windows start up menu so it will launch automatically when you boot your system. All the connections will remain, IF the MIDI Devices are connected as they were while making this guide.
Setting MIDI Devices in macOS:
macOS can share MIDI devices between applications, so there are no additional steps required here!
However, you can add your device in the Audio- and MIDI-setup application to show up the real device names in your DAW MIDI device list.
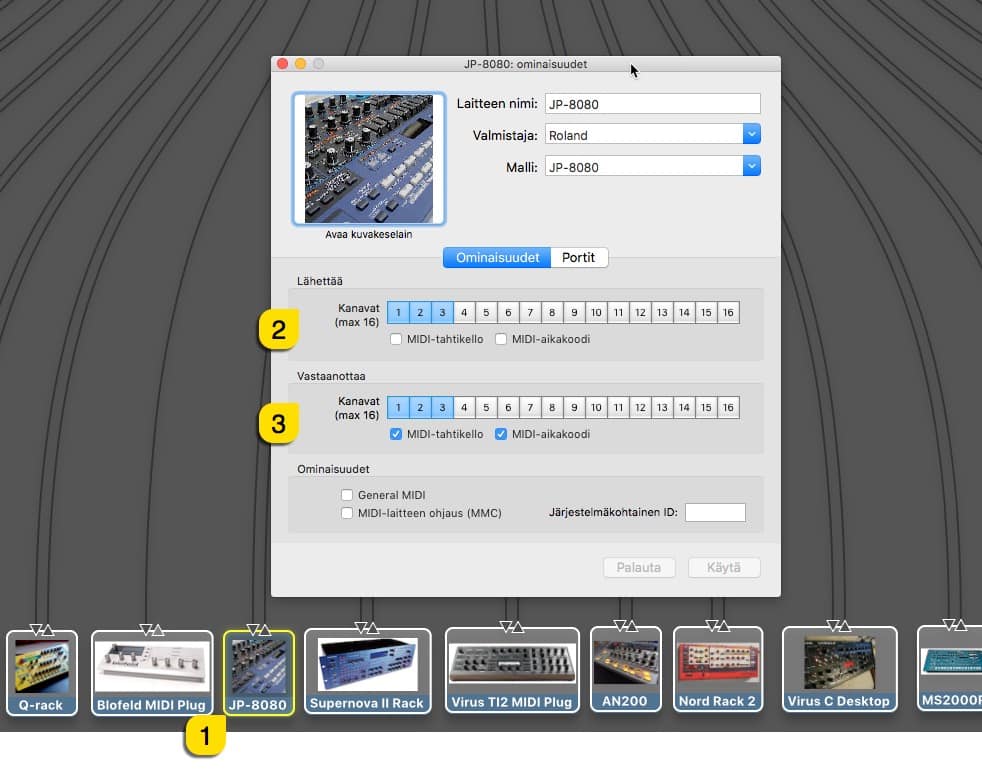
You can see from the image below, how I’ve dragged connections from each of my synth to my MIDI interfaces where they are connected in / out at. This will result the DAW to display the MIDI port names as written above.
In the image below, is an example how I’ve done my Roland JP-8080 [1] definitions in Audio- and MIDI-setup. I have defined that my JP-8080 Transmits [2] MIDI messages from channels 1-3 and Receives [3] MIDI messages from channel 1-3 + receives Realtime Clock & MIDI Time Code.
That is it for the MIDI setup tutorial. We hope you find this useful!
Troubleshooting
loopMIDI and MIDI-OX are both shipping their own user manuals, so please refer to their documentary to learn more about how they work.


