
Everything you need to know about our product install, setup steps, configuration and usage of various features
LIBRARIAN EDIT MENUS
This chapter contains a lot, so let’s break it down a bit.
After BANK functions are done with, we will check how to import banks to Librarian and how to save banks to HDD. There is also some helpful actions in the menu as well.
Let’s begin!
BANK EDIT menu overview
BANK EDIT MENU [1] is only accessible in the LIBRARIAN view.

PulseX Editor User Manual – Bank Edit Menu
There are different segments in the menu to keep functions in order:
- Request Patch Data…
- Store Patch Data…
- Sync Current Data from HW
- Push Current Data to HW
Functions above represents hardware to software and software to hardware specific commands.
- Save (Overwrite current bank)
- Save As…
- Import…
- Refresh Folders
Functions above are HDD to librarian and librarian to HDD specific commands. Rest of the functions are not relevant to Librarian usage, and we will discuss them later in the manual.
Request PROGRAM Data from Hardware
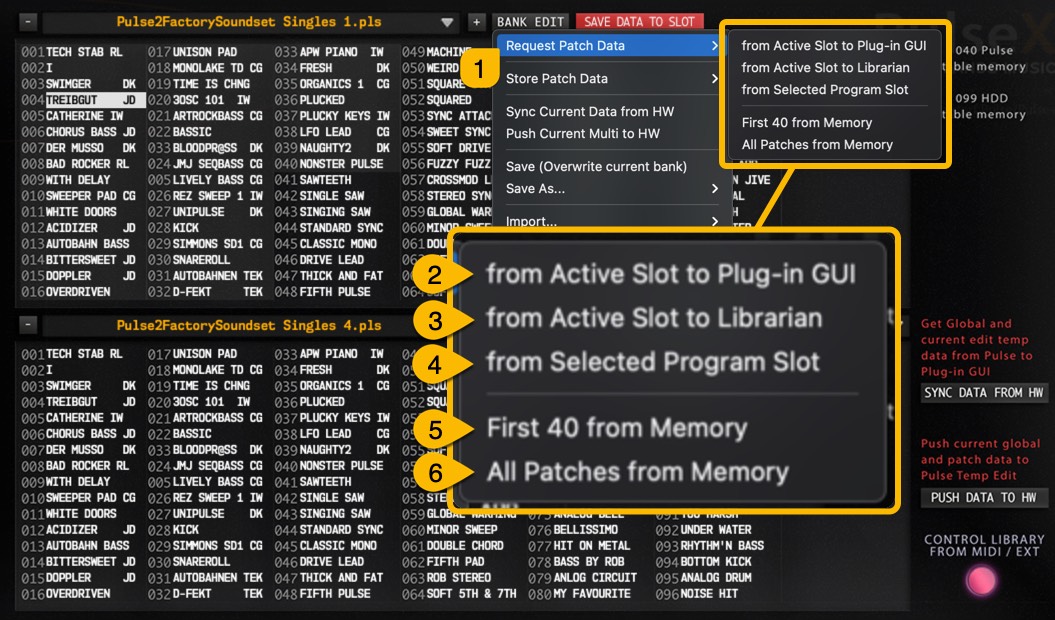
Open BANK EDIT menu and select Request Patch Data… [1] item from the menu. This will open a sub menu, with different request options:
[2] from Active Slot to Plug-in GUI
- Requests temporary Program data from Pulse to the plug-in user interface.
[3] from Active Slot to Librarian
- Requests temporary Patch data from Pulse on plug-in user interface to active slot in the librarian view.
[4] from Selected Program Slot
- Requests Patch data from Pulse memory based on the currently selected Librarian slot.
[5] First 40 from Memory
- Requests first 40 Programs from Pulse to Librarian. (this option is here only because Pulse has 40 slots where user can write data).
[6] All Patches from Memory
- Requests all Programs from Pulse to Librarian.
PulseX Editor User Manual – Request Data Options
Store PROGRAM Data to Hardware
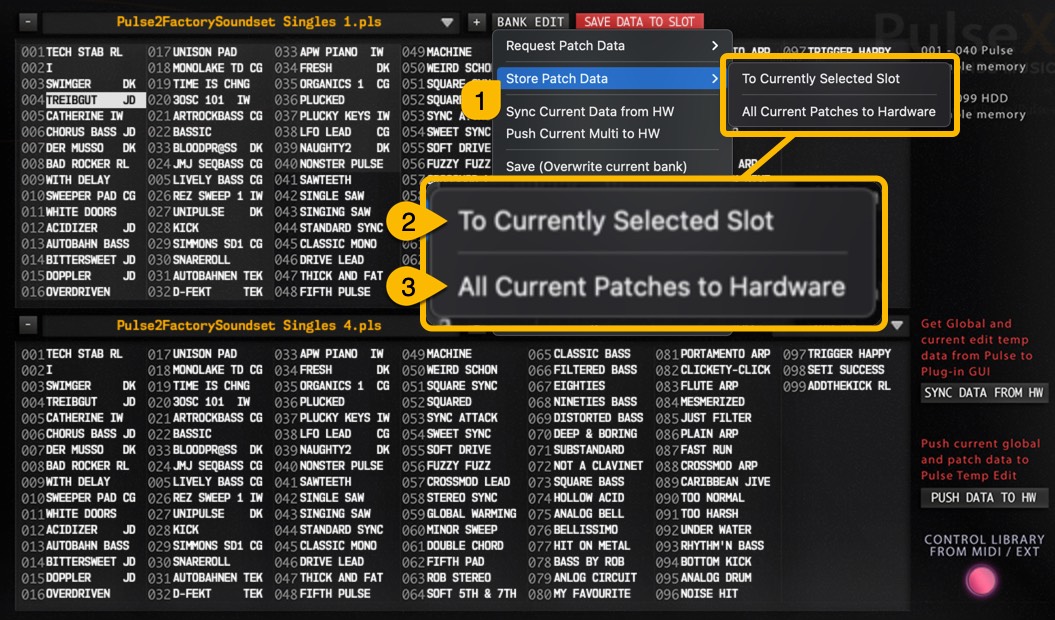
Open BANK EDIT menu and select Store Patch Data… [1] item from the menu. This will open a sub menu, with different storing options:
[2] To Currently Selected Location
- Store selected librarian slot patch to hardware memory based on currently select slot number.
[3] All Current Patches to Hardware
- Store all 40 patches from currently active Librarian list to Pulse memory.
PulseX Editor User Manual – Store Data Options
TIP #6: You can toggle on Search filter on the Librarian and store search result patches to the hardware memory if you wish to do so! Just remember to make the lower list active before storing data.
TIP #7: Do not disturb the data flow while writing is in progress. Let it complete the write task and start your tweaks after it is finished.
Sync Data with HW
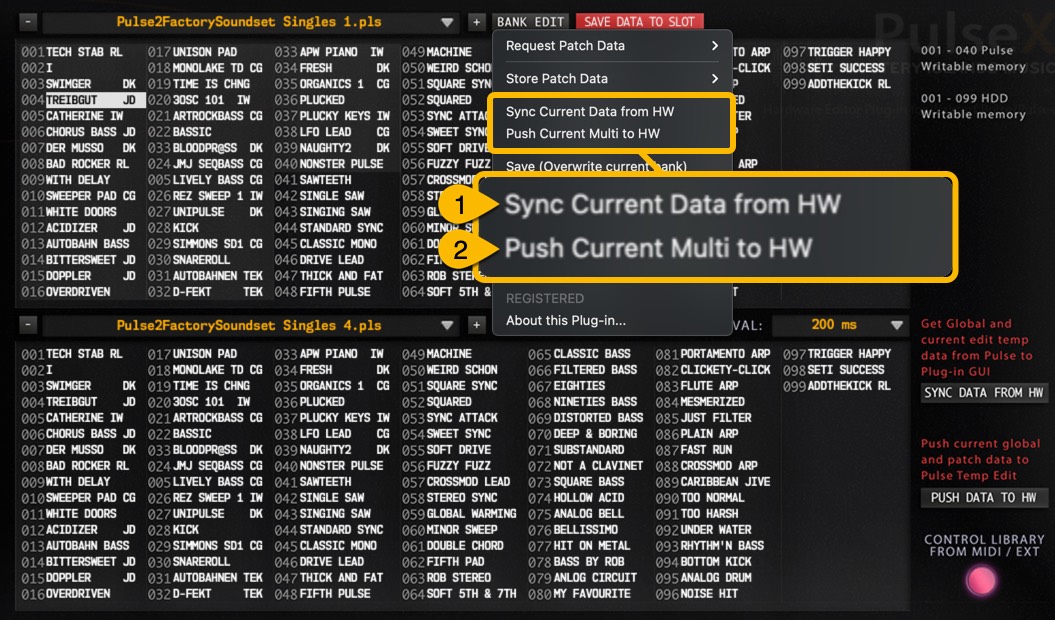
Sync Current Data from HW [1] will request the entire PROGRAM and System settings from the Pulse to the plug-in user interface. Same function is achieved with “SYNC DATA FROM HW” button.
Push Current Data to HW [2] will push your current plug-in user interface settings to the hardware temp memory. Same function is achieved with “PUSH DATA TO HW” button.
PulseX Editor User Manual – Sync and Push Data Options
Save (Overwrite current bank)
Clicking Save will overwrite your currently chosen bank in the Upper Librarian View. In this case we would overwrite “Pulse2FactorySoundset Singles 1.pls” permanently!

PulseX Editor User Manual – Overwrite Current Bank
Save As…
Open BANK EDIT MENU and select Save As… [1] to view available options:
[2] Standard MIDI (*.mid)
- Writes the current upper list bank as a Standard MIDI (*.mid) file to your HDD.
[3] PulseX Format (*.pls)
- Writes the current upper list bank as a PulseX formatted (*.pls) file to your HDD.

PulseX Editor User Manual – Save Bank As..
NOTE #1: Save your bank to Patches folder / sub-folder to view it in Patch Librarian.
NOTE #2: Set the bank name after selected option is chosen. Keep the name simple!
Import…
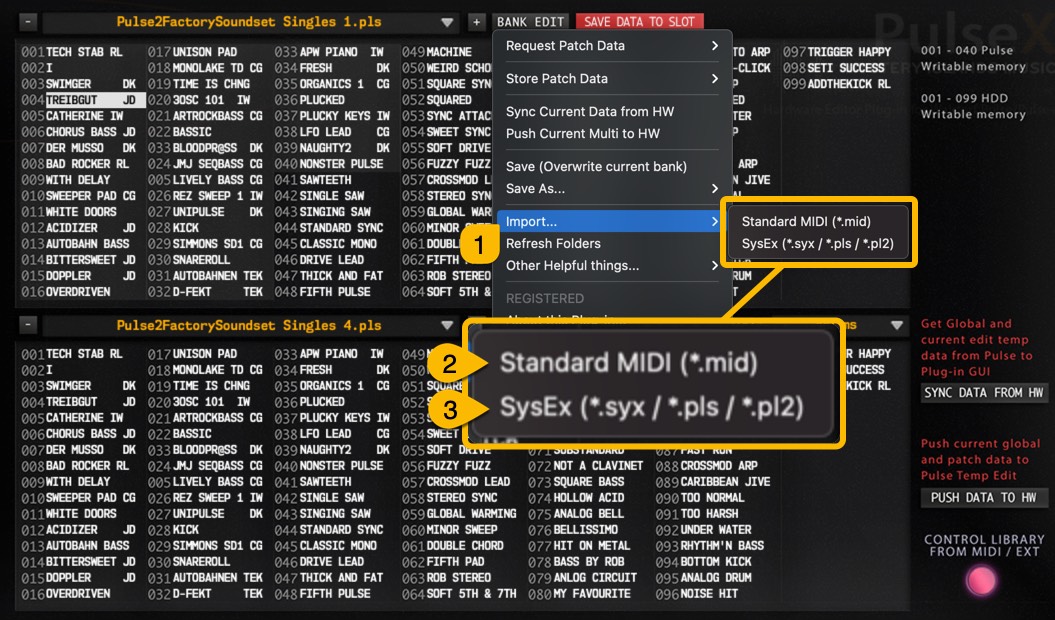
Open BANK EDIT MENU and choose Import… [1] to view options below
[2] Standard MIDI (*.mid)
- Import Standard MIDI files to Librarian. See notes below!
[3] SysEx (*.syx / *.pls / *.pl2)
- Import System Exclusive / PulseX Editor pls / Pulse2X Editor pl2 files to Librarian. See notes below!
PulseX Editor User Manual – Import Bank..
NOTE #1: Librarian will only import data to librarian if the file contains Waldorf Pulse / Pulse+ / Pulse 2 formatted Patches.
NOTE #2: Individual Patch import works in right click menu. See details below.
Refresh Folders
If you have made changes to the Patches folder outside the plug-in, you can click Refresh Folders [1] to reload the Patches folder content and rebuild the menu structures.

PulseX Editor User Manual – Refresh Menus for New Banks
Other Helpful Things…
Some helpful actions and sources have been collected on this menu. Open BANK EDIT menu and choose Other Helpful Things … [1] to view the sub menu with following options:
[2] Open Data Folder
- Open Data Folder will open the data folder based on you OS. If you run macOS, different location is opened compared to Windows. See data location notes earlier in the manual!
[3] Open User Manual
- not available in this version!
[4] Open Support Ticket
- Opens your browser and sends you towards our ticket submission page. Report any bugs or feature request from Tickets page.
[5] Check for Updates
- Checks for available product updates from internet.
[6] DAW Setup Guides
- Opens your browser and sends you towards our knowledge base site for DAW Setup Guides.
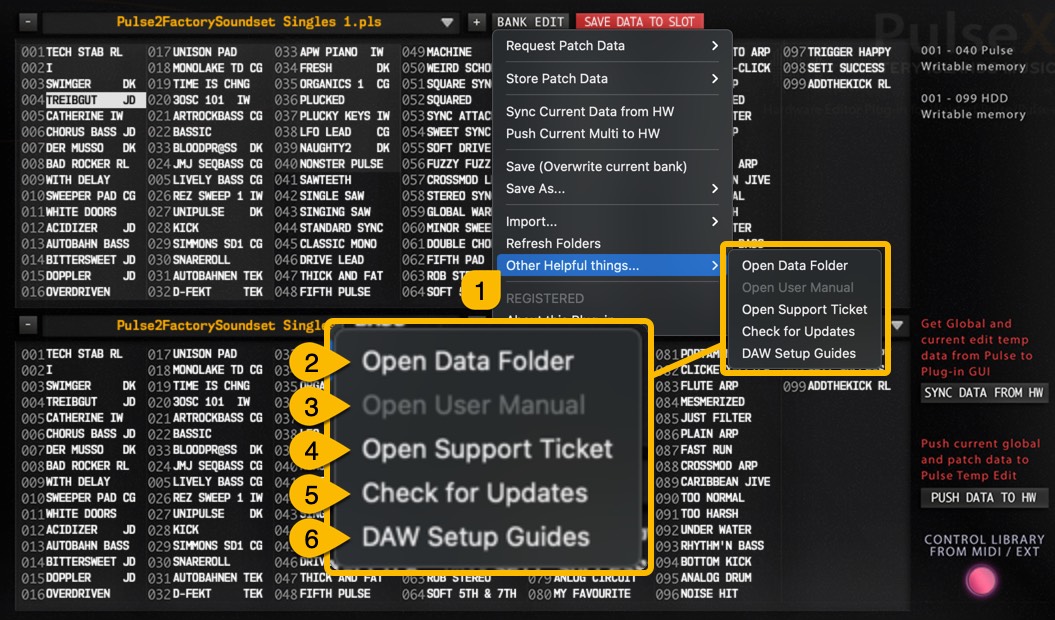
PulseX User Manual – Other Helpful Things..
Register Plug-in… / REGISTERED
Indicates if the plug-in has not yet been or is registered. We covered this topic earlier in the user manual.

PulseX Editor User Manual – Registered
About this Plug-in…
Opens About window. Click anywhere in the background to exit.

PulseX Editor User Manual – About This Product
Librarian View Right Click menu
We are not done with Librarian functions yet. We still have right click menu functions to cover.
Right click in lower list only shows option to copy, whereas in upper list it has a lot more options because the upper list is our edit buffer like mentioned earlier.
Let’s dive into the details!
PulseX Editor User Manual – Right Click on Upper List View
Lower list Right Click
Like mentioned above, there is only one option in the lower list, which is Copy. This will copy the right clicked librarian item to the clipboard.
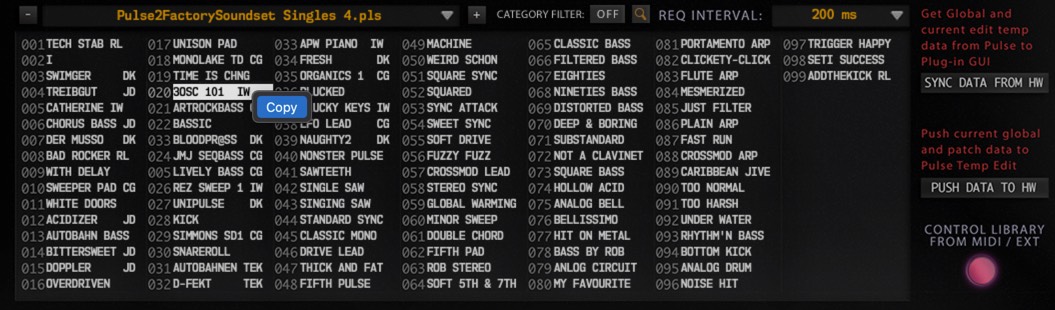
PulseX Editor User Manual – Right Click on Lower List View
Upper list Right Click
Upper list has a lot more options than the lower list because this is our “edit buffer” like mentioned earlier.
[1] Paste
- Paste data from clipboard to chosen slot.
[2] Rename
- Opens a new dialog to rename the patch in the librarian.
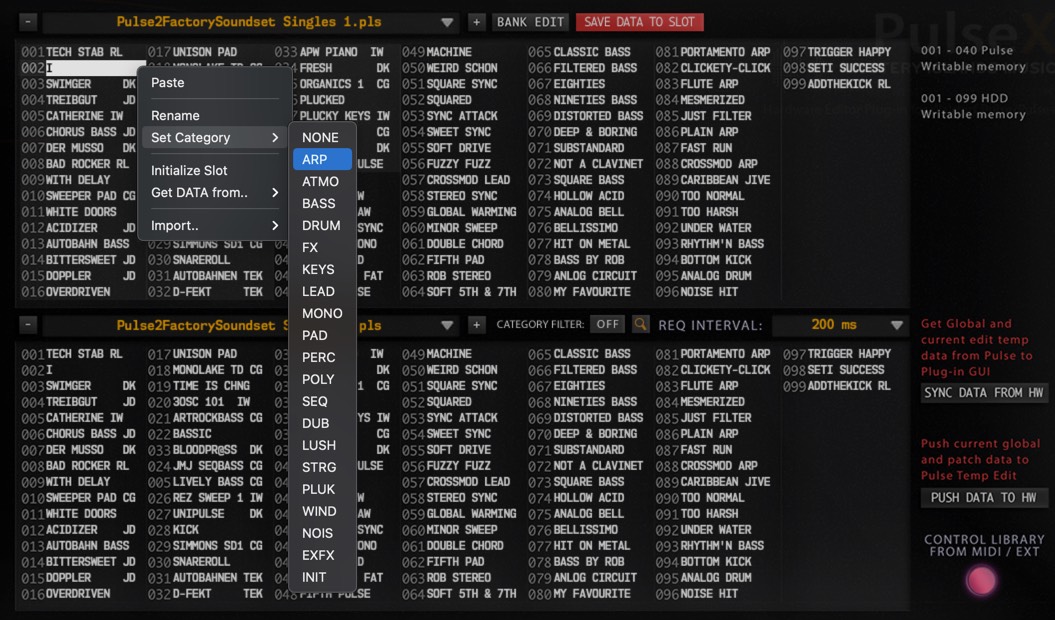
[3] Set Category
- Displays a dropdown menu to set a category for the selected patch.
[4] Initialize Slot
- Initializes currently selected slot from the librarian.
[5] Get DATA from..
[5.a] Plug-in (active patch)
- Gets current data from the plug-in user interface to the currently selected librarian slot.
[5.a] Hardware Edit Buffer
- Gets current temp PROGRAM data from the hardware to selected slot.
[5.b] Hardware by Program No.
- Gets data from hardware based on the selected librarian slot number.
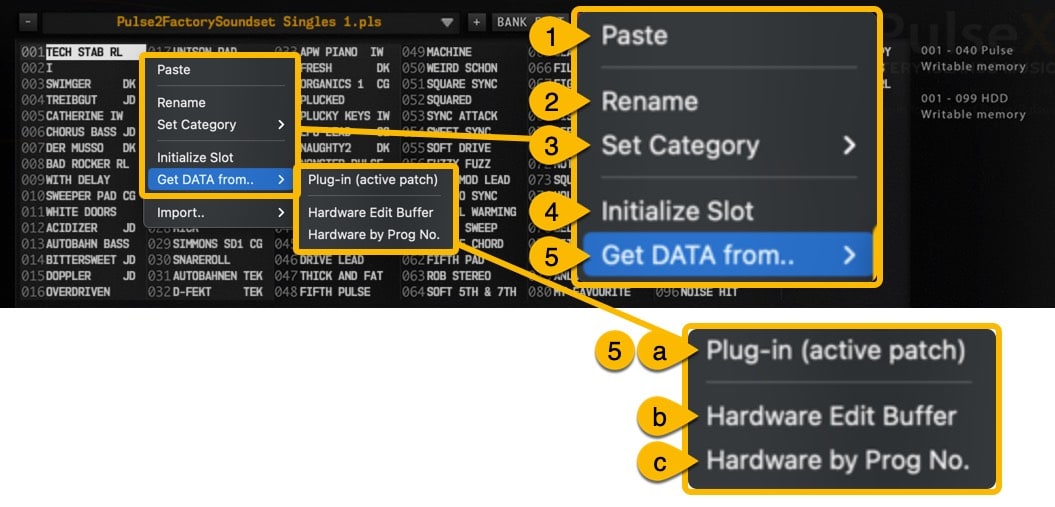
PulseX Editor User Manual – Right Click on Upper List View
[1] Import
[1.a] Pulse 1 Single Patch
- Import Pulse 1 formatted single patch file to librarian slot.
[1.b] Pulse 2 Single Patch
- Import and convert Pulse 2 formatted single patch file to librarian slot.
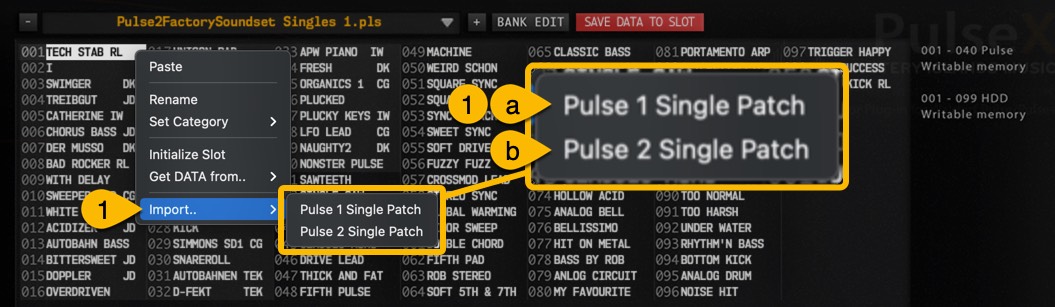
PulseX Editor User Manual – Right Click on Upper List View
This is it – You’ve got it all from the Editor perspective.
If you have any questions about the product, you can reach us from our Discord server
We are open for new feature requests, roses and surely, we would love to know if we’ve done something wrong as well!
If you would like to contribute and help our development work, head to our Ko-fi page and support us there – That would be super helpful and keep the business alive.