
Everything you need to know about our product install, setup steps, configuration and usage of various features
Make the connection, again
Set your Virus Device ID
First, set the Device ID [1] from the Editor interface. Device ID value can be modified from the MULTIMODE MIXER [2] view.
Device ID should be set to 1, but if you have multiple Viruses, it is a good practice to have them all on different ID. This will protect the other units from accidental data overwrite and value changes.

Virus Editor Manual – Device ID
Set your Virus Model
Select appropriate Virus model [1] so that the communication works as expected. If you have wrong model selected, you will get unexpected time-outs and data is not transmitted to the hardware as expected.

Virus Editor Manual – Hardware Model
- Virus A users should select Virus A-range.
- Virus Rack users should select Virus Rack.
- Virus B, KB, Indigo and Classic users should select Virus B-range.
- Virus C, KC and Indigo 2 users should select Virus C-range.
- Virus Rack XL users should select Virus Rack XL.
- Virus TI (1/2) and TI Pølar users should select Virus TI-range.
- Virus TI Snow users should select Virus TI Snow.
Parameter differences between models
Select your Virus Model [1] from the “top bar” of the user interface to access parameters which are available for your hardware model. Some parameters are grayed out based on the selection made. I.e., reverb parameters on Effect 2 tab are available for Virus TI and Virus TI Snow users only. In example below, you can see new oscillator modes and envelopes appearing [2] when Virus TI is selected as active model. More about model change further below.

Virus Editor Manual – Model Differences
Set MIDI Ports
Select ports with Standalone Application
If you use the Standalone Application, click “Access Virus Editor [1]” from top bar and choose Preferences [2]. This will open Preferences dialog [3] where you can set MIDI Input Device and MIDI Output Device.
On Windows machines, the same dialog can be opened from File menu.

Virus Editor User Manual – Setting MIDI Ports
Remote Keyboard Input port
If you have an external MIDI controller you want to use with the Editor to trigger notes and tweak knobs with, you can select MIDI IN from the Editor top bar. This port won’t work with the synth itself and is only used for triggering MIDI events.
Remote Keyboard Input available in Standalone App only!
This port is only visible with Standalone Application.
NOTE: Audio Device Settings in the preferences dialog does not have capability to transmit audio in this stage. Choose Audio Drivers, but keep in mind that audio has to go through Audio Jacks to console or sound card inputs.
Select ports with Plug-in
Select MIDI IN [1], where your Virus MIDI Out is connected in at.
Select MIDI OUT [2] port which will send data to your Virus MIDI Input.

Virus Editor User Manual – Plug-in MIDI Ports
NOTE: If you use Virus TI with USB connection, then on macOS choose “Virus TI USB Plugin I/O” and on Windows choose “Virus TI Synth” for MIDI In and MIDI Out. MIDI and USB cannot be used at the same time!
HARDWARE CHECK / PING
After setting MIDI OUT, our Editor will start scanning for the hardware. If there is no immediate response, the Editor will attempt 3 more times. If there is no response, you might get a “Connection Timed Out” message. If so, double check your hardware settings and make sure your cables are good!
NOTE: MIDI ports for plug-in are set from the main window while Standalone Application MIDI ports are set from the Editor Preferences.
Editor Control Display will say “Editor is ready to go!” when response is received from the Virus.

Virus Editor User Manual – Ready to go!
You can optionally enable Device ID probing function, which will check for the Device ID for you. This is good IF you have only one Virus model in your setup. Function can be enabled from Utilities [1] menu -> Editor Preferences [2] -> Enable DeviceID Scanning [3].

Virus Editor User Manual – DeviceID Scanning
NOTE: If you have Device ID set to 1 on the Virus and 1 on the Editor, our Editor will find your Virus if everything else is configured properly.
SYNCHRONIZE DATA FROM HARDWARE TO THE EDITOR
This is the final step before you can start making your own adjustments IF “Enable Hardware Auto-connect” is disabled from Utilities menu as explained in previous section! Click Sync Data From HW [1] button to synchronize active SEQ / MULTISINGLE data from your Virus to the Editor user interface. This needs to be done only when new instance is loaded so that the Editor and you know what was set in the hardware already.

Virus Editor User Manual – Sync Data From HW
After the “Sync data from HW” process is completed, you should check the MULTIMODE MIXER [1] view. Verify part MIDI CHA [2] is what you expect it to be, part output [3] is routed where you want and that your part key range [4] values are not out of range.

Virus Editor User Manual – Check MULTI Settings
You can now pursue with your own editing tasks, patch manipulations and experiments as you wish!
NOTE #1: Be patient and do not disturb the data flow with any knob movements or so. This will ensure the data packages are being sent and received as expected and you are not going to receive any SysEx error messages!
NOTE #2: All parts should ideally have individual MIDI channels to avoid control change conflicts. You can stack sounds together by setting the MIDI channel to same value, just keep in mind that control changes affect both layers!
STORE DEFAULTS IN FILE
You have the option to store your Editor defaults from the Utilities menu if you don’t have more than one Virus in your setup. This is good when you insert a new instance of our Editor in a new project – Everything is setup the way you wanted.
Click Utilities [1] menu, select Editor Preferences [2] and click Save all settings as Defaults [3]. After doing so, every time the Editor is loaded, your preferred settings are already applied. You can remove the defaults option by revisiting the same menu and select “Clear Editor Defaults”.

Virus Editor User Manual – Store Defaults in File
If you ever encounter any issues with defaults loading wrong data or editor crashes while loading defaults, you can disable this function from “data location”/Access Virus Editor PREFS.txt by changing line loadcustomdata:true to loadcustomdata:false – save and exit and load your session again!
ADVANCED MIDI SETTINGS
You can control which messages gets processed and which do not. Open Advanced MIDI Settings window by clicking ADVANCED MIDI SETTINGS button in the Editor user interface.

Virus Editor User Manual – Open Advanced MIDI Settings from bottom left corner
You can block messages being processed from DAW or from the Synthesizer itself. Settings seen in the image below are default values.

Virus Editor User Manual – Advanced MIDI Settings view
Advanced Incoming MIDI settings
Allow certain MIDI messages to pass into the Editor processor within Incoming MIDI setting section. Green check mark means it will be processed and when there is no check mark, it will be bypassed. Process DAW messages [1]and Process Hardware messages [2] has their own set of data “filters” [3-9] available as follows:
- [3] Control Changes
- [4] Program Changes
- [5] Note Messages
- [6] Pitch Bend
- [7] Poly Aftertouch
- [8] Channel Aftertouch
- [9] System Exclusive
- [10] Part LEDs tracks incoming MIDI and SysEx messages
When green check mark is on, incoming data from DAW and Hardware ports is monitored and LED indicator will flash when data is coming in. When check mark is off, outgoing data is being monitored.
Check LEDs Off function to disable.

Virus Editor User Manual – Advanced Incoming MIDI Settings
Note #1: If you disable Control Changes and System Exclusive messages from Hardware port, your Editor might stop responding to hardware knob movements completely.
Note #2: In Standalone Application use, Remote Keyboard MIDI Input data is handled in Process DAW messages section.
Advanced Outgoing MIDI settings
In Outgoing MIDI settings section, you can adjust few options to fine tune the Editor behavior.
Send note MIDI data from Plug-in:
- Directly to Hardware [1] = Send all MIDI related command directly to hardware from the MIDI output port.
- With attempt to match DAW buffer setting [2] = experimental attempt to sync with DAW time.

Virus Editor User Manual – Advanced Outgoing MIDI Settings
NOTE: If the Editor MIDI note handling is out of time, we would advise NOT to adjust these settings at all. Check your DAW user guide to figure out how to delay or advance your MIDI note timing / delay compensation.
MIDI Clock (experimental)
We are experimenting to add general MIDI clock to the Editor by standard feature. This might crash on some systems on a specific setup, so be cautious when experimenting with it.
Check Send Sequencer Start / Stop Commands [1] if you want to send MTC start and stop commands.
Check Send Continuous MIDI Clock information [2] if you want to sync MIDI clocked Effects and Arpeggiator to the Editor tempo information.
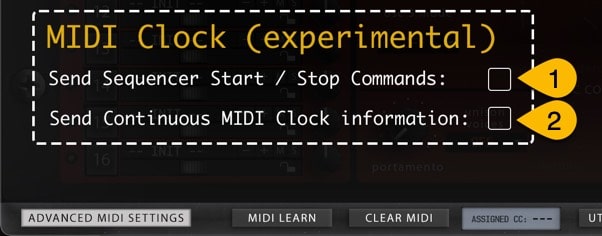
Virus Editor User Manual – Experimental MIDI Clock
NOTE: The clock with the Editor might be inaccurate, so if you have another solution to sync clock information from your DAW to the hardware, use that instead.
User Manual contents
Chapter 1
Introduction to our Editor, what it can and can not do
Chapter 2
Checking wiring diagrams, Hardware and MIDI settings + registration guide
Chapter 3
Successfully establish the connection to your Hardware
Chapter 4
Hardware functions and our custom functions explained in great detail
Chapter 5
Basic layout and guide how to use the Patch Librarian
Chapter 6
Deeper analysis of the Patch Librarian Menu functions
Troubleshooting
Why there is no sound? Why no connection? Time to troubleshoot!