
Everything you need to know about our product install, setup steps, configuration and usage of various features
PREPARE YOUR SYNTHESIZER FOR THE EDITOR
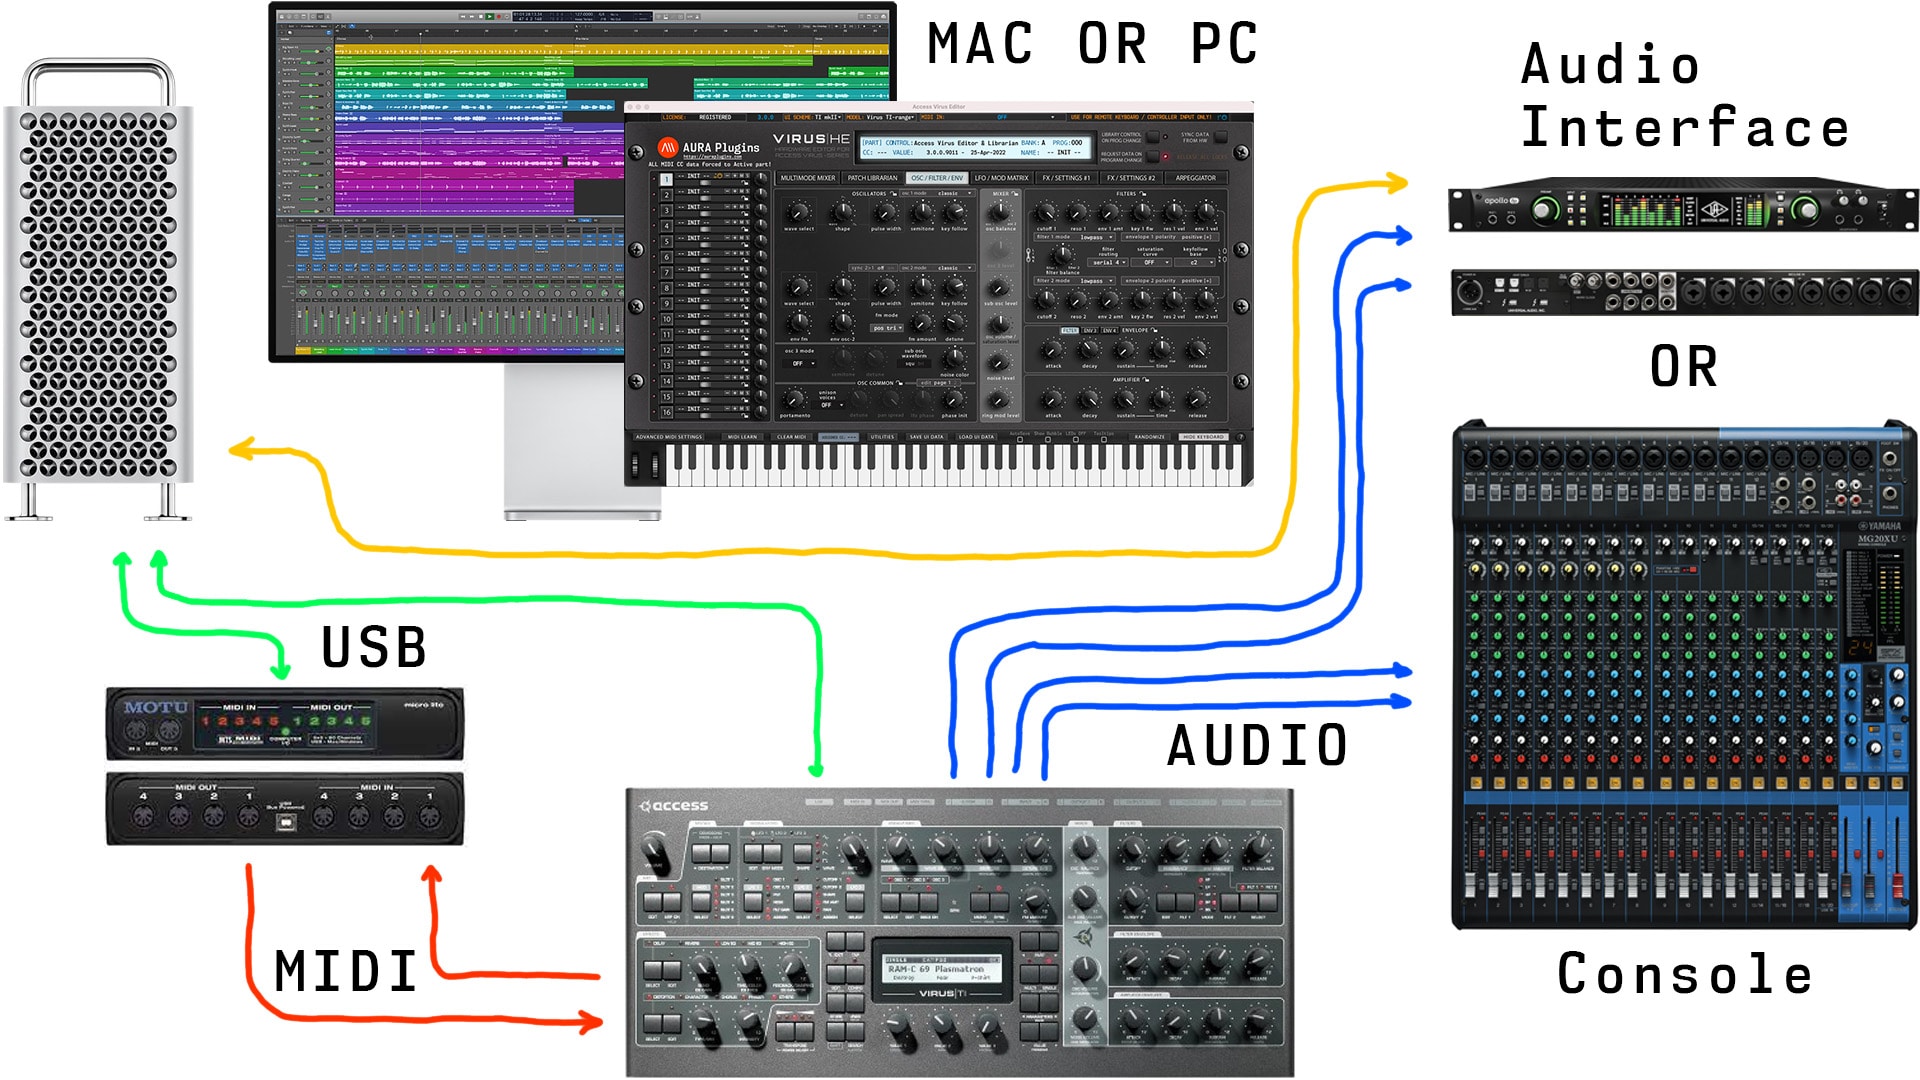
Connect the MIDI cables from your synthesizer to the MIDI interface and Audio Jacks to your console / sound card. MIDI out from synth to MIDI interface IN and vice versa. MIDI thru connections will not work.
- MIDI Out from MIDI interface to Virus MIDI In port.
- MIDI Out from Virus to MIDI interface MIDI In port.
- double check your cables!
- Audio from Virus Out 1-2 to console or sound card inputs.
- Add more audio cables from Virus output ports as needed.
Note for Virus TI Users: If you plan to use MIDI cables instead of USB connection, DISCONNECT the USB cable from your Virus or the Editor won’t be able to establish the connection.
NOTE #2: When USB is plugged in, Virus TI MIDI terminals will act as a MIDI interface for your host computer.
Wiring diagram example
Virus Editor User Manual – If MIDI is used, unplug the USB cable
Power up your Virus. Our editor is designed to work “out of the box” and control all parameters from single application instance.
Note: Our Editor is designed to work only in multisingle / sequencer-mode. Single-mode is not supported and we are not going to change that. There is zero benefit of using the Virus in single mode.
Configure Virus A, B, C, Rack and Rack XL series
After Virus is powered up, enter Global settings and apply following settings.
Note: Menu and Button examples from Virus C user manual.

Virus Editor User Manual – Enter Multi mode

Virus Editor User Manual – Enter Global settings
Virus Editor User Manual – Enter Multi mode
If parameter is not mentioned, you can skip it and navigate forward.
External Clock Note: Arpeggiator will not play unless DAW is unable to provide MIDI Clock. Windows: Check our method of using MIDI OX and LoopBe together to provide MIDI clock from DAW to your synth.
Configure Virus TI and TI Snow series
After Virus is powered up, enter System settings and apply following settings.
Note: Menu and Button examples from Virus TI user manual.
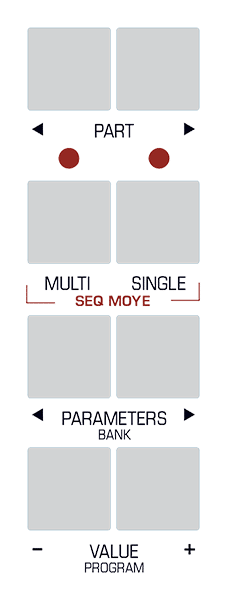
Virus Editor User Manual – Enter Multi mode
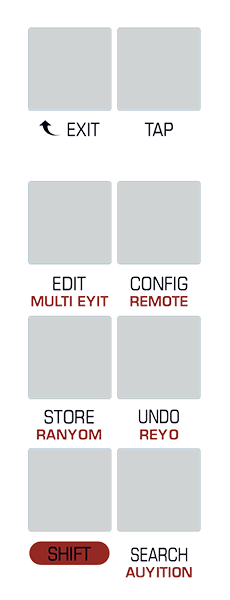
Virus Editor User Manual – Enter Config menu
Use PARAMETER buttons to find and VALUE buttons to adjust following parameters
If parameter is not mentioned, you can skip it and navigate forward.
All set! We are now ready to open our plug-in in DAW or Standalone Application!
To get more information about how to adjust your synth, read the Access Virus User Manual.
External Clock Note: Arpeggiator will not play unless DAW is unable to provide MIDI Clock. Windows: Check our method of using MIDI OX and LoopBe together to provide MIDI clock from DAW to your synth.
PREPARE YOUR DAW FOR THE PLUG-IN
Check the configuration guide for your system below. Start from the “Setting MIDI Devices” guide and then check your DAW guide.
| Config Guide | Date | Online |
|---|---|---|
| Setting MIDI Devices | 12-Jan-2021 | View |
| Ableton Live | 08-Mar-2021 | View |
| Apple Logic Pro | 08-Mar-2021 | View |
| AVID ProTools with Blue Cat's PatchWork | 16-Mar-2021 | View |
| Bitwig Studio | 14-Mar-2021 | View |
| Cockos Reaper | 14-Mar-2021 | View |
| Image-Line Fruity Loops Studio | 10-Mar-2021 | View |
| MOTU Digital Performer | 12-Mar-2021 | View |
| PreSonus Studio One | 10-Mar-2021 | View |
| Reason Studios Reason | 12-Mar-2021 | View |
| Renoise | 17-Mar-2021 | View |
| Steinberg Cubase Pro | 11-Mar-2021 | View |
| Universal Audio LUNA | N/A | View |
Disable physical MIDI ports from your DAW
One of the most important things, especially on Windows platform is that you must disable your physical MIDI ports from your DAW settings which are used to connected to synthesizer. And make sure that those ports are not used within your DAW at all.
If the port is used inside your DAW and you try to assign MIDI input / MIDI output in the Editor, it might crash and you could potentially lose your work!
For example, Ableton Live has an option to enable track and/or sync for all ports individually, which need to be turned off for MIDI input and output ports intended to use with the Editor.
Using your synth as Master Keyboard?
No problem, on Windows you can install two applications: MIDI-OX and loopMIDI to make a virtual connection and route that back into your DAW for note events. On macOS, MIDI ports can be open in two “applications” at the same time. More details in “Setting MIDI Devices” manual.
Insert the plug-in into your project
First Run / Plug-in Scan
After the configuration guide of Setting MIDI Devices and the configuration guide for your DAW are done, you can safely open your DAW and start the plug-in scanning process.
If the plug-in scan fails, please try to validate it again. If the plug-in won’t validate, send the error log for our inspection – details given at Downloads section above.
Once your DAW is ready, insert our Editor plug-in to instrument track and read next part about registration if you purchased the full license from our store. If not, you can head down to “Make the connection, again” part.
macOS NOTE #1: If errors started to appear after updating the product, navigate to
Macintosh HD/Library/AURA Plugins/
- remove “product name” folder, i.e. Waldorf Blofeld Editor and...
- remove “Shared” folder.
Install the product again and try to validate the plug-in again.
NOTE #2: Your Computer GPU must have support for Open GL 2.1 graphics or greater.
REGISTER OUR EDITOR WITH LICENSE
If you made the decision to purchase the license for our Editor, you are the best! Just wanted to thank YOU.
License owners can enjoy the full advantages of the Editor, like:
- Use all available Parts.
- Plug-in parameters can be automated directly from your DAW.
- Librarian is fully functional and allows full editing possibilities.
- You can save your UI Data (full arrangement) to HDD.
- You can save your MIDI CC maps to HDD.
- Total Recall: Once you open your project after your last session, all the data used in your previous session will be automatically sent to your synthesizer.
- Get tech support and updates with lifetime license or while subscription is active!
If you purchased Editor license from our store, download the license and the full installer from
https://auraplugins.com/downloads/access-virus-editor/ after you login.
Unzip the full installer and run it from your computer. If installer fails, try again as follows:
Right click the installer and choose “open”. You can safely ignore all warnings.
[Rename license to] Access Virus Editor.license
NOTE: Right click the license file on macOS and select “show info”. After that make sure the file name is shown as above. If it has .key extension in it, remove it!
Manually placing the license file
If you have plug-in inserted to your project, now it is time to delete the track / plug-in instance from your DAW.
Rename license.key as per instructed above manually and copy it to the Editor data folder (see location mentioned earlier). If all is good, you can now re-insert your plug-in to your DAW.

Virus Editor User Manual – License file location in macOS
Register product from User Interface
Method #1
Click the top left corner of the user interface where the Editor says, “RELOAD LICENSE [1]”. New window will open to prompt for license [2]. Locate the license [3] and hit OK to register. See image below.

Virus Editor User Manual – Register method #1
Method #2
Once you’ve installed the FULL version and you have your Editor user interface opened, enter Patch Librarian [1], click Bank Edit [2] and choose Register Editor… [3]. A file prompt dialog will pop up just like in the image above.

Virus Editor User Manual – Register method #2
After you have chosen the license file, remove the plug-in instance from your DAW and insert it again. Editor display should now indicate “REGISTERED” in the top left corner.
IF the Editor shows “** DEMO VERSION **” you haven’t installed the FULL version yet or you might have the plug-in installed in several locations! Check solution from Troubleshooting section.
FILTER INCOMING MIDI DATA FROM PHYSICAL PORT
In order to prevent duplicate MIDI data flow passing to our plug-in, take a good look at your DAW user guide how to filter or block MIDI messages from the hardware.
Here is an example: I am using Virus C and our Virus Editor plug-in in my project. If I move a Filter Cutoff knob from the synthesizer, it will send MIDI message out to physical MIDI device. Now, from there, your DAW will process this message and pass it into your record / monitor enabled track if it is not blocked / filtered. We don’t need this data to pass thru twice since we are going to open the physical ports in the plug-in user interface. I hope that made sense.
If in the other hand, you are using Virus KC, you might want to pass the note data thru to your DAW in order to play other virtual instruments.
In such a scenario, allow only note data to pass through from the input port and open Advanced MIDI Settings [1] window and filter out note processing [2] from the hardware port.

Virus Editor User Manual – Advanced MIDI Settings
User Manual contents
Chapter 1
Introduction to our Editor, what it can and can not do
Chapter 2
Checking wiring diagrams, Hardware and MIDI settings + registration guide
Chapter 3
Successfully establish the connection to your Hardware
Chapter 4
Hardware functions and our custom functions explained in great detail
Chapter 5
Basic layout and guide how to use the Patch Librarian
Chapter 6
Deeper analysis of the Patch Librarian Menu functions
Troubleshooting
Why there is no sound? Why no connection? Time to troubleshoot!