
Configuration articles and guides for software and hardware. These settings are mandatory unless otherwise stated
Access Virus TI USB Audio and macOS 10.12 and up – Is it going to work?
UPDATED Jul 28th 2023
Yes. We have been able to get six Virus TI USB Audio channels to work inside our DAW. We are running macOS 12.6.2 Monterey with M1 powered MacBook Pro. As a long time Logic Pro user, it was just an experimental idea to check “what if…” and boom! It worked! Note that Logic Pro is not required, this works with every macOS out of the box.
OK, let’s get into it. What do you need?
- Access Virus TI (obviously)….
- USB cable.
- USB-C to USB 2.0 Hub
- Access Virus Editor full version (since it contains our generic USB driver to transmit MIDI from and to Virus TI).
And the big question: Why?
Since macOS Catalina came out, Apple did change up their OS quite a bit. It is a struggle with developers trying to keep up the pace with Apple and their recent changes. Now with M1 machines things took another turn. But luckily this fairly simple method will solve the issue. But only partially. Any perhaps until we find a way to integrate the Virus TI USB Audio stream directly onto our plugin / application, natively.
Enough of talking technical stuff, let’s connect the Virus TI to your latest and greatest macOS again!
Install our Access Virus Editor from the downloads page ($69.95 is a very small fee for a fully working editor). Demo works too, but you are missing a lot features with it!
After install is completed, unplug MIDI cables from your Virus TI and plug in the USB cable. Virus TI display will say “Audio clock changed” and “USB” text will appear in the top right corner.
UPDATE 2022-Sep-30th : UNINSTALL Access Virus Control software, if you have it installed on your computer. Once rebooted, open new Finder window and navigate to: /Library/Audio/MIDI Drivers/ – check and make sure Virus TI MIDI Driver.plugin is removed.
This should leave you with AURA Plugins Virus TI USB Midi.plugin and some other MIDI drivers.
Next navigate to: /Library/Extensions/ – check and make sure AccessVirusTI.kext is removed.
Audio MIDI Setup
Power up your Virus TI and open Audio MIDI Setup.app from your macOS -> Applications -> Utilities folder. If you can’t see Audio Devices window, click “window” and “show audio devices”.
Once the application is running, you can see “Virus TI” being listed on the devices list.
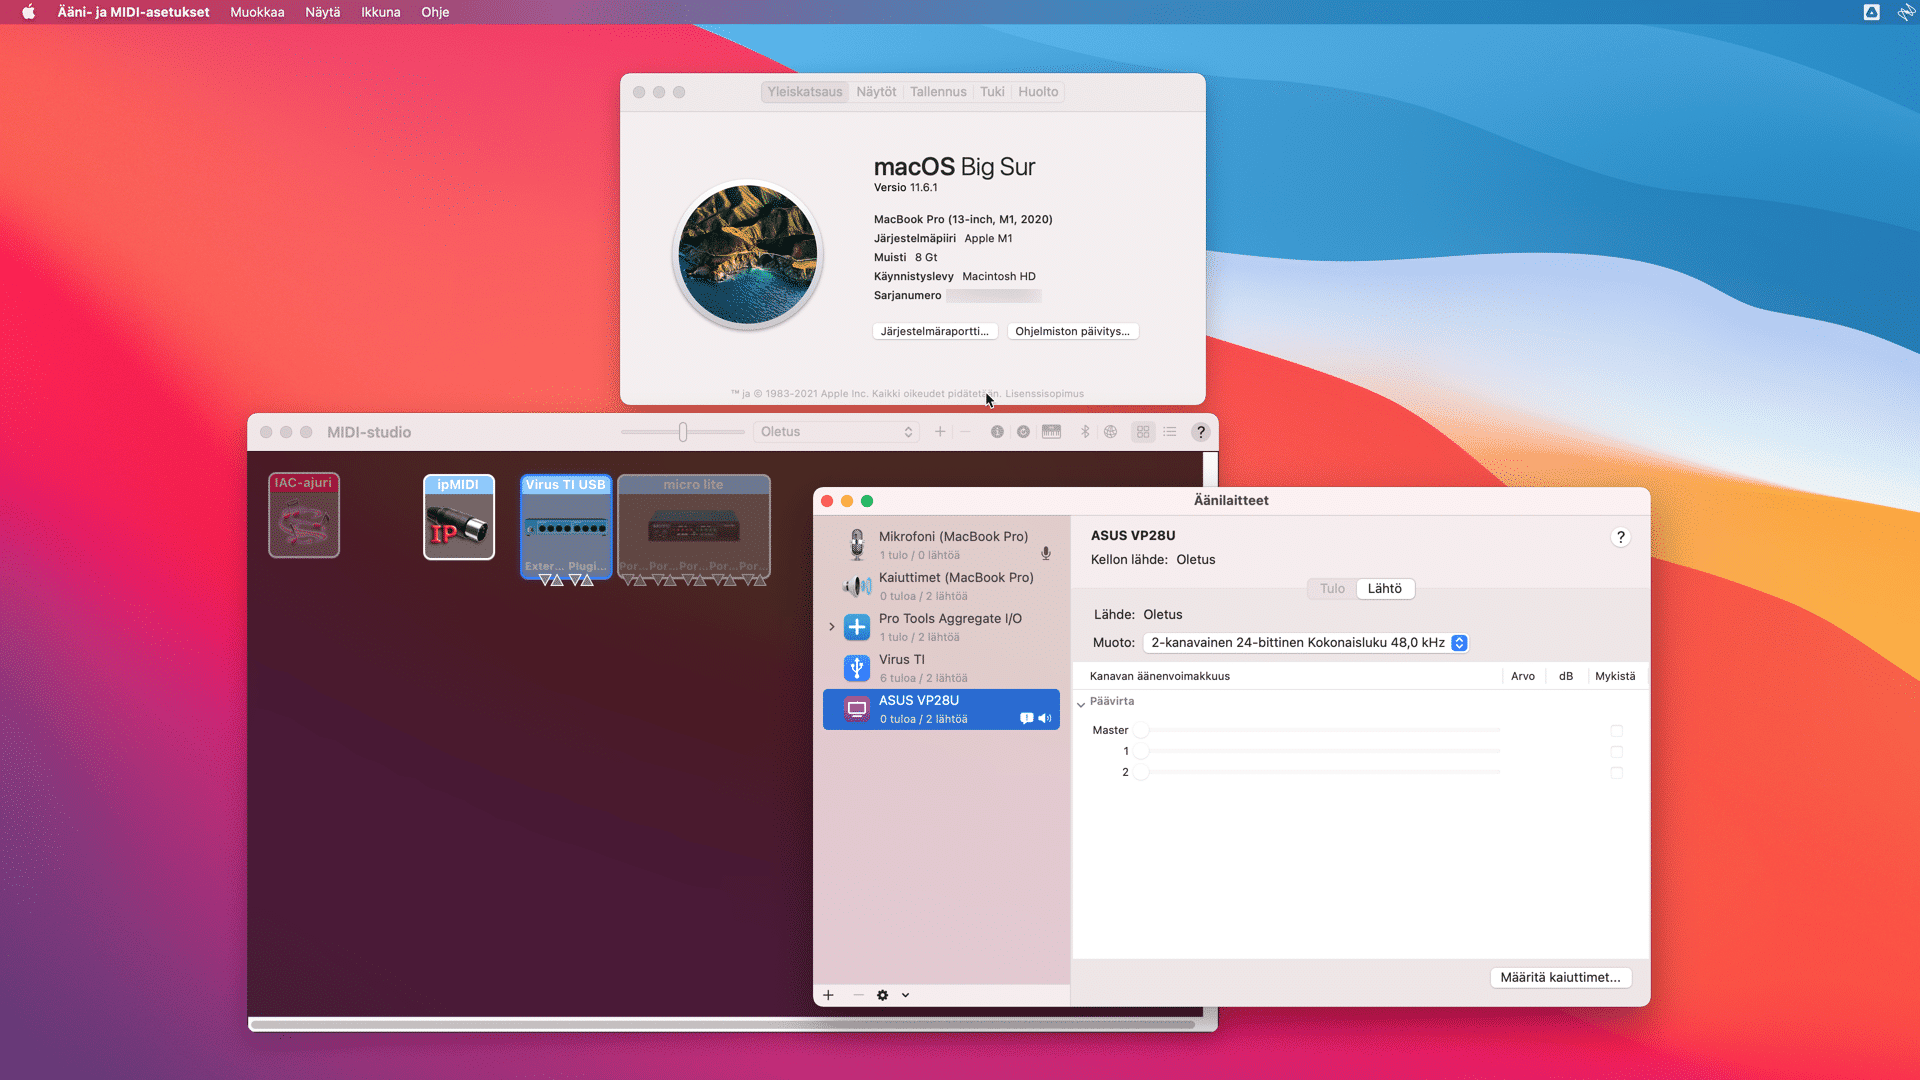
Open Audio MIDI Setup and view audio devices
NOTE: Do not use multiple hubs to connect the USB from Virus TI to your Mac. I am using USB4 to USB3 hub on my MacBook Pro to establish the connection.
Create new Aggregate Device
To get the audio from the Virus TI to your DAW, we must create new aggregate device. Click “+” sign to show the menu and select create new aggregate device [1].
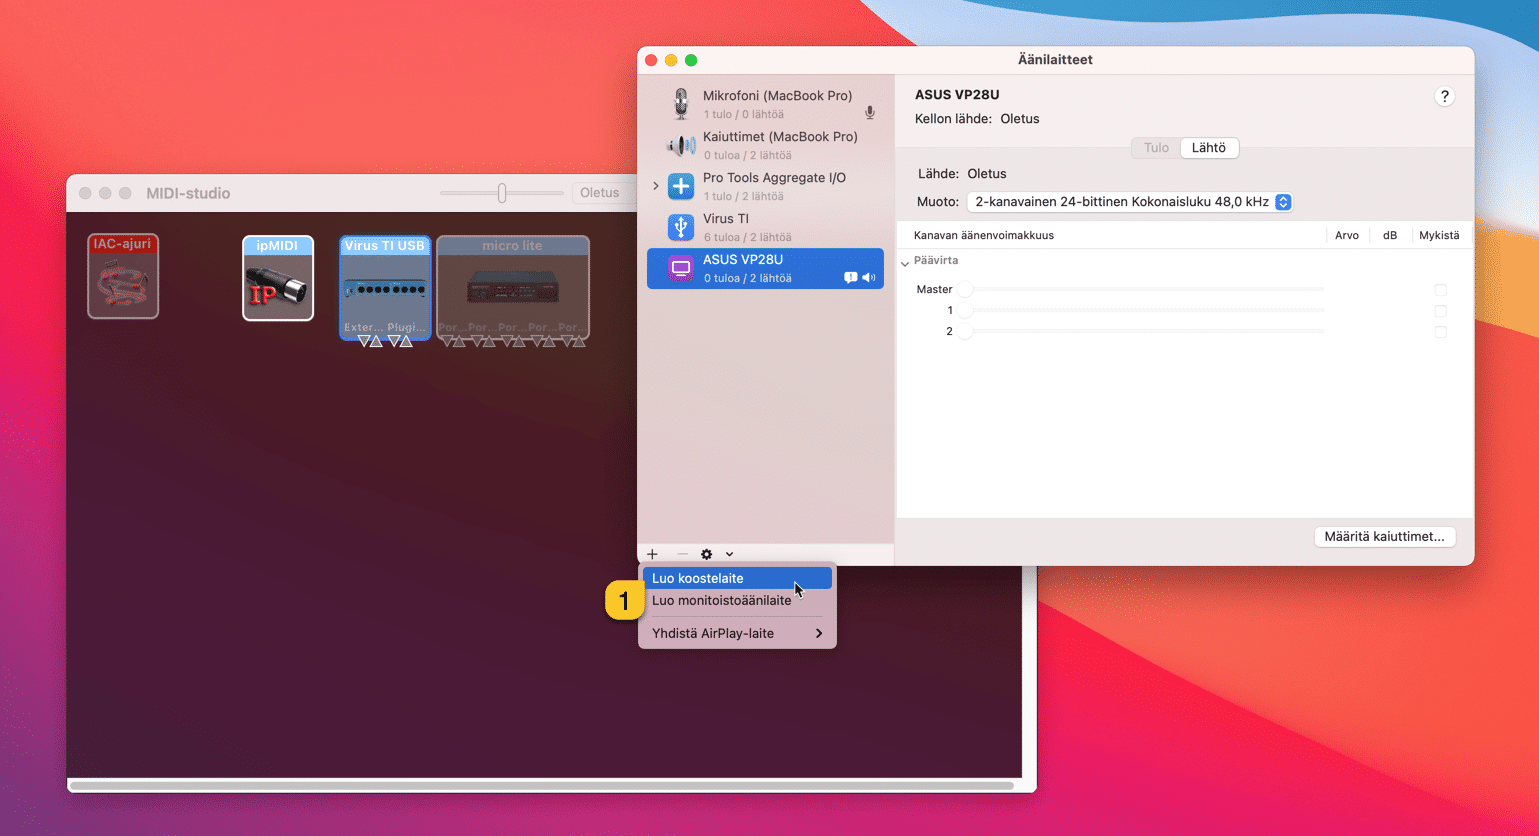
Create new aggregate device
Rename the device to your liking. I’ve renamed mine “Master + Virus TI”. Keep it simple.
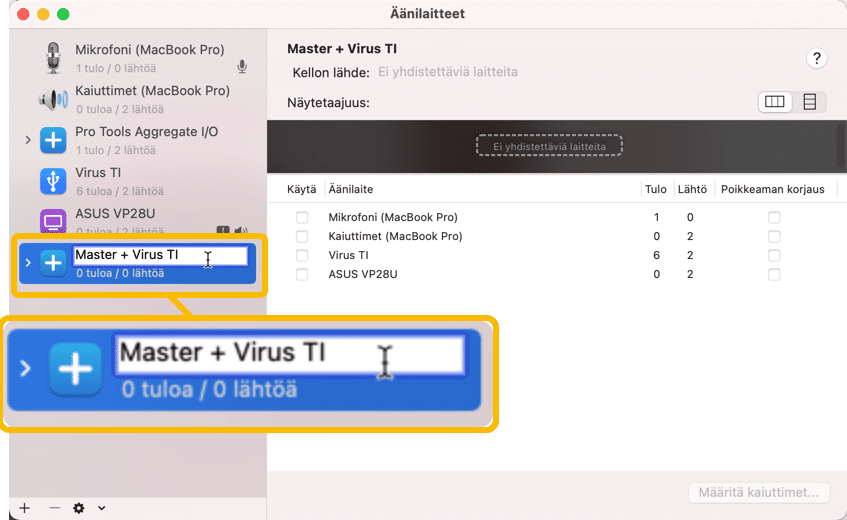
Rename your aggregate device as you prefer
“link” devices to form the aggregate device. Select your “master” soundcard from the list first [1]. The first device acts as a clock source! Add Virus TI last in the list [2].
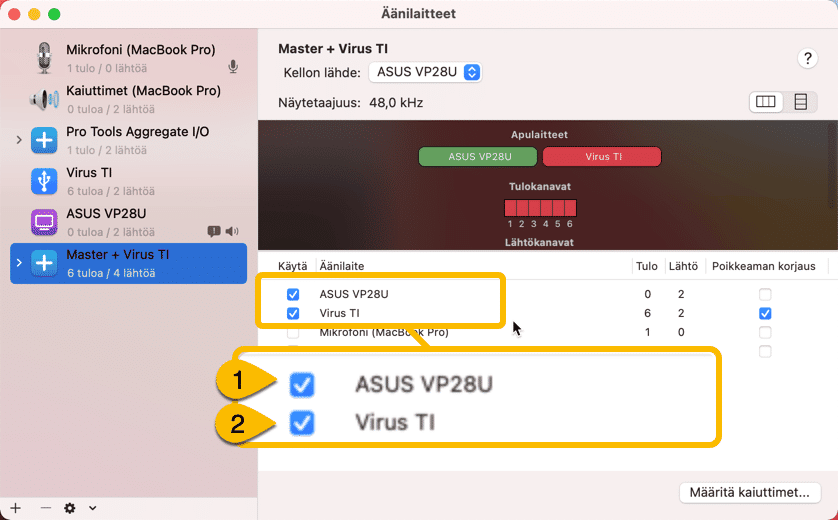
Link devices together to get audio from Virus TI
Change the view to “list” view for input and output channels [1], expand the window to see more input channels as you prefer [2]. I like to view all 6 inputs from the Virus TI on my list [3].
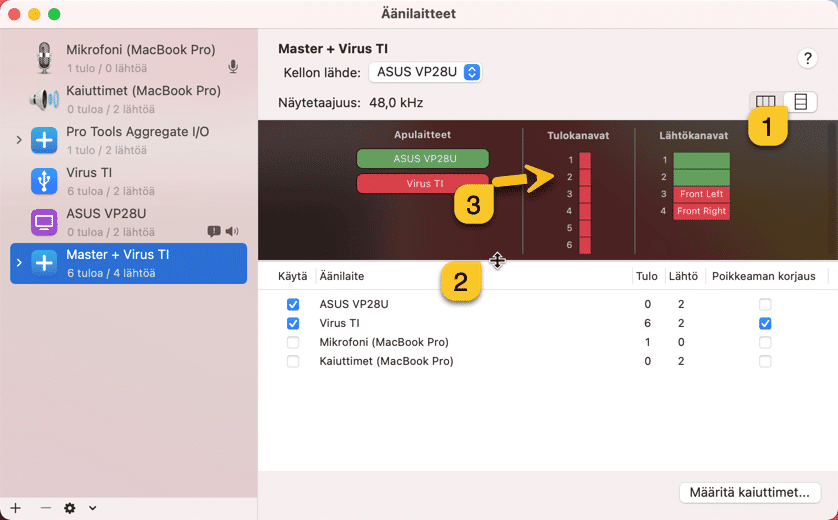
Set view to list mode for easier I/O renaming
Click the small “+” sign on top of the channel 1 to rename it. Virus TI USB Audio stream is routed like this:
1 = USB out5
2 = USB out6
3 = USB out1
4 = USB out2
5 = USB out3
6 = USB out4

Move mouse over the input channel to see the +-sign
And the result:
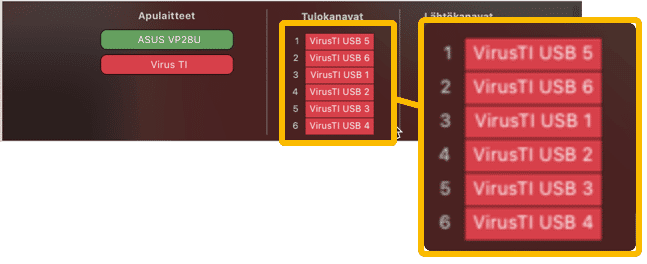
Input channels after renaming
OK, everything is done here so far. Lets check the MIDI-studio to see that our Virus TI USB is indeed connected.
This can be verified when the “Virus TI USB” device is “lit“. If you click info balloon from the top bar, it will say “device is online“.
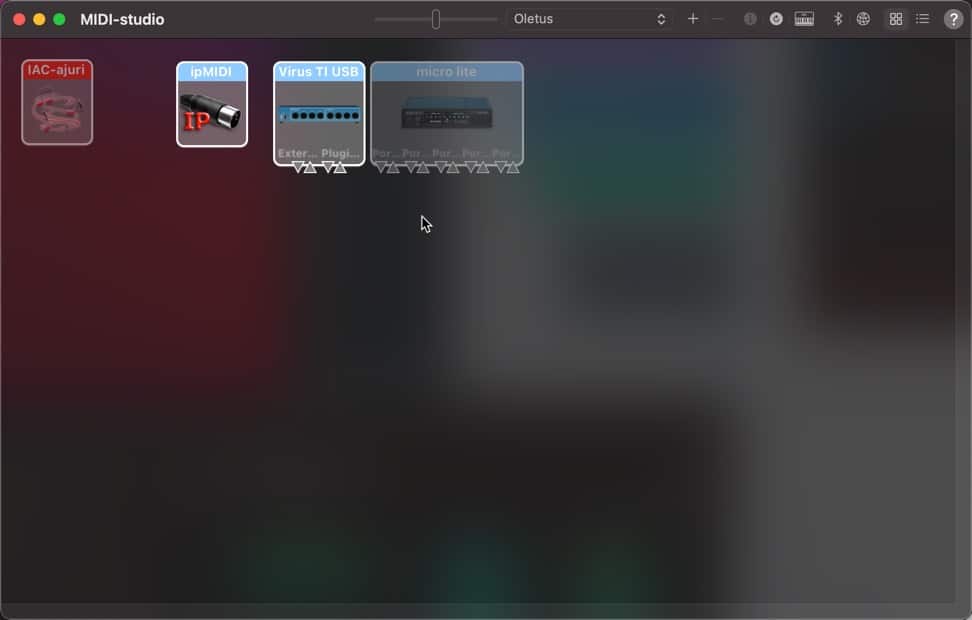
Check if device is online
Everything seems to be working as expected! Lets open our DAW and finish it off!
NOTE: When you boot up your mac, make sure to have your Virus TI booted BEFORE so that the Audio MIDI Setup app can detect the Aggregate Device. Otherwise it may show the Virus TI “grayed out” and you will not get any audio from the Virus TI!
Logic Pro Configuration
As I said earlier, I am a long time Logic user, so it is natural for me to show how it is done with it. You can study our own DAW user manual to learn how to configure Audio in it.
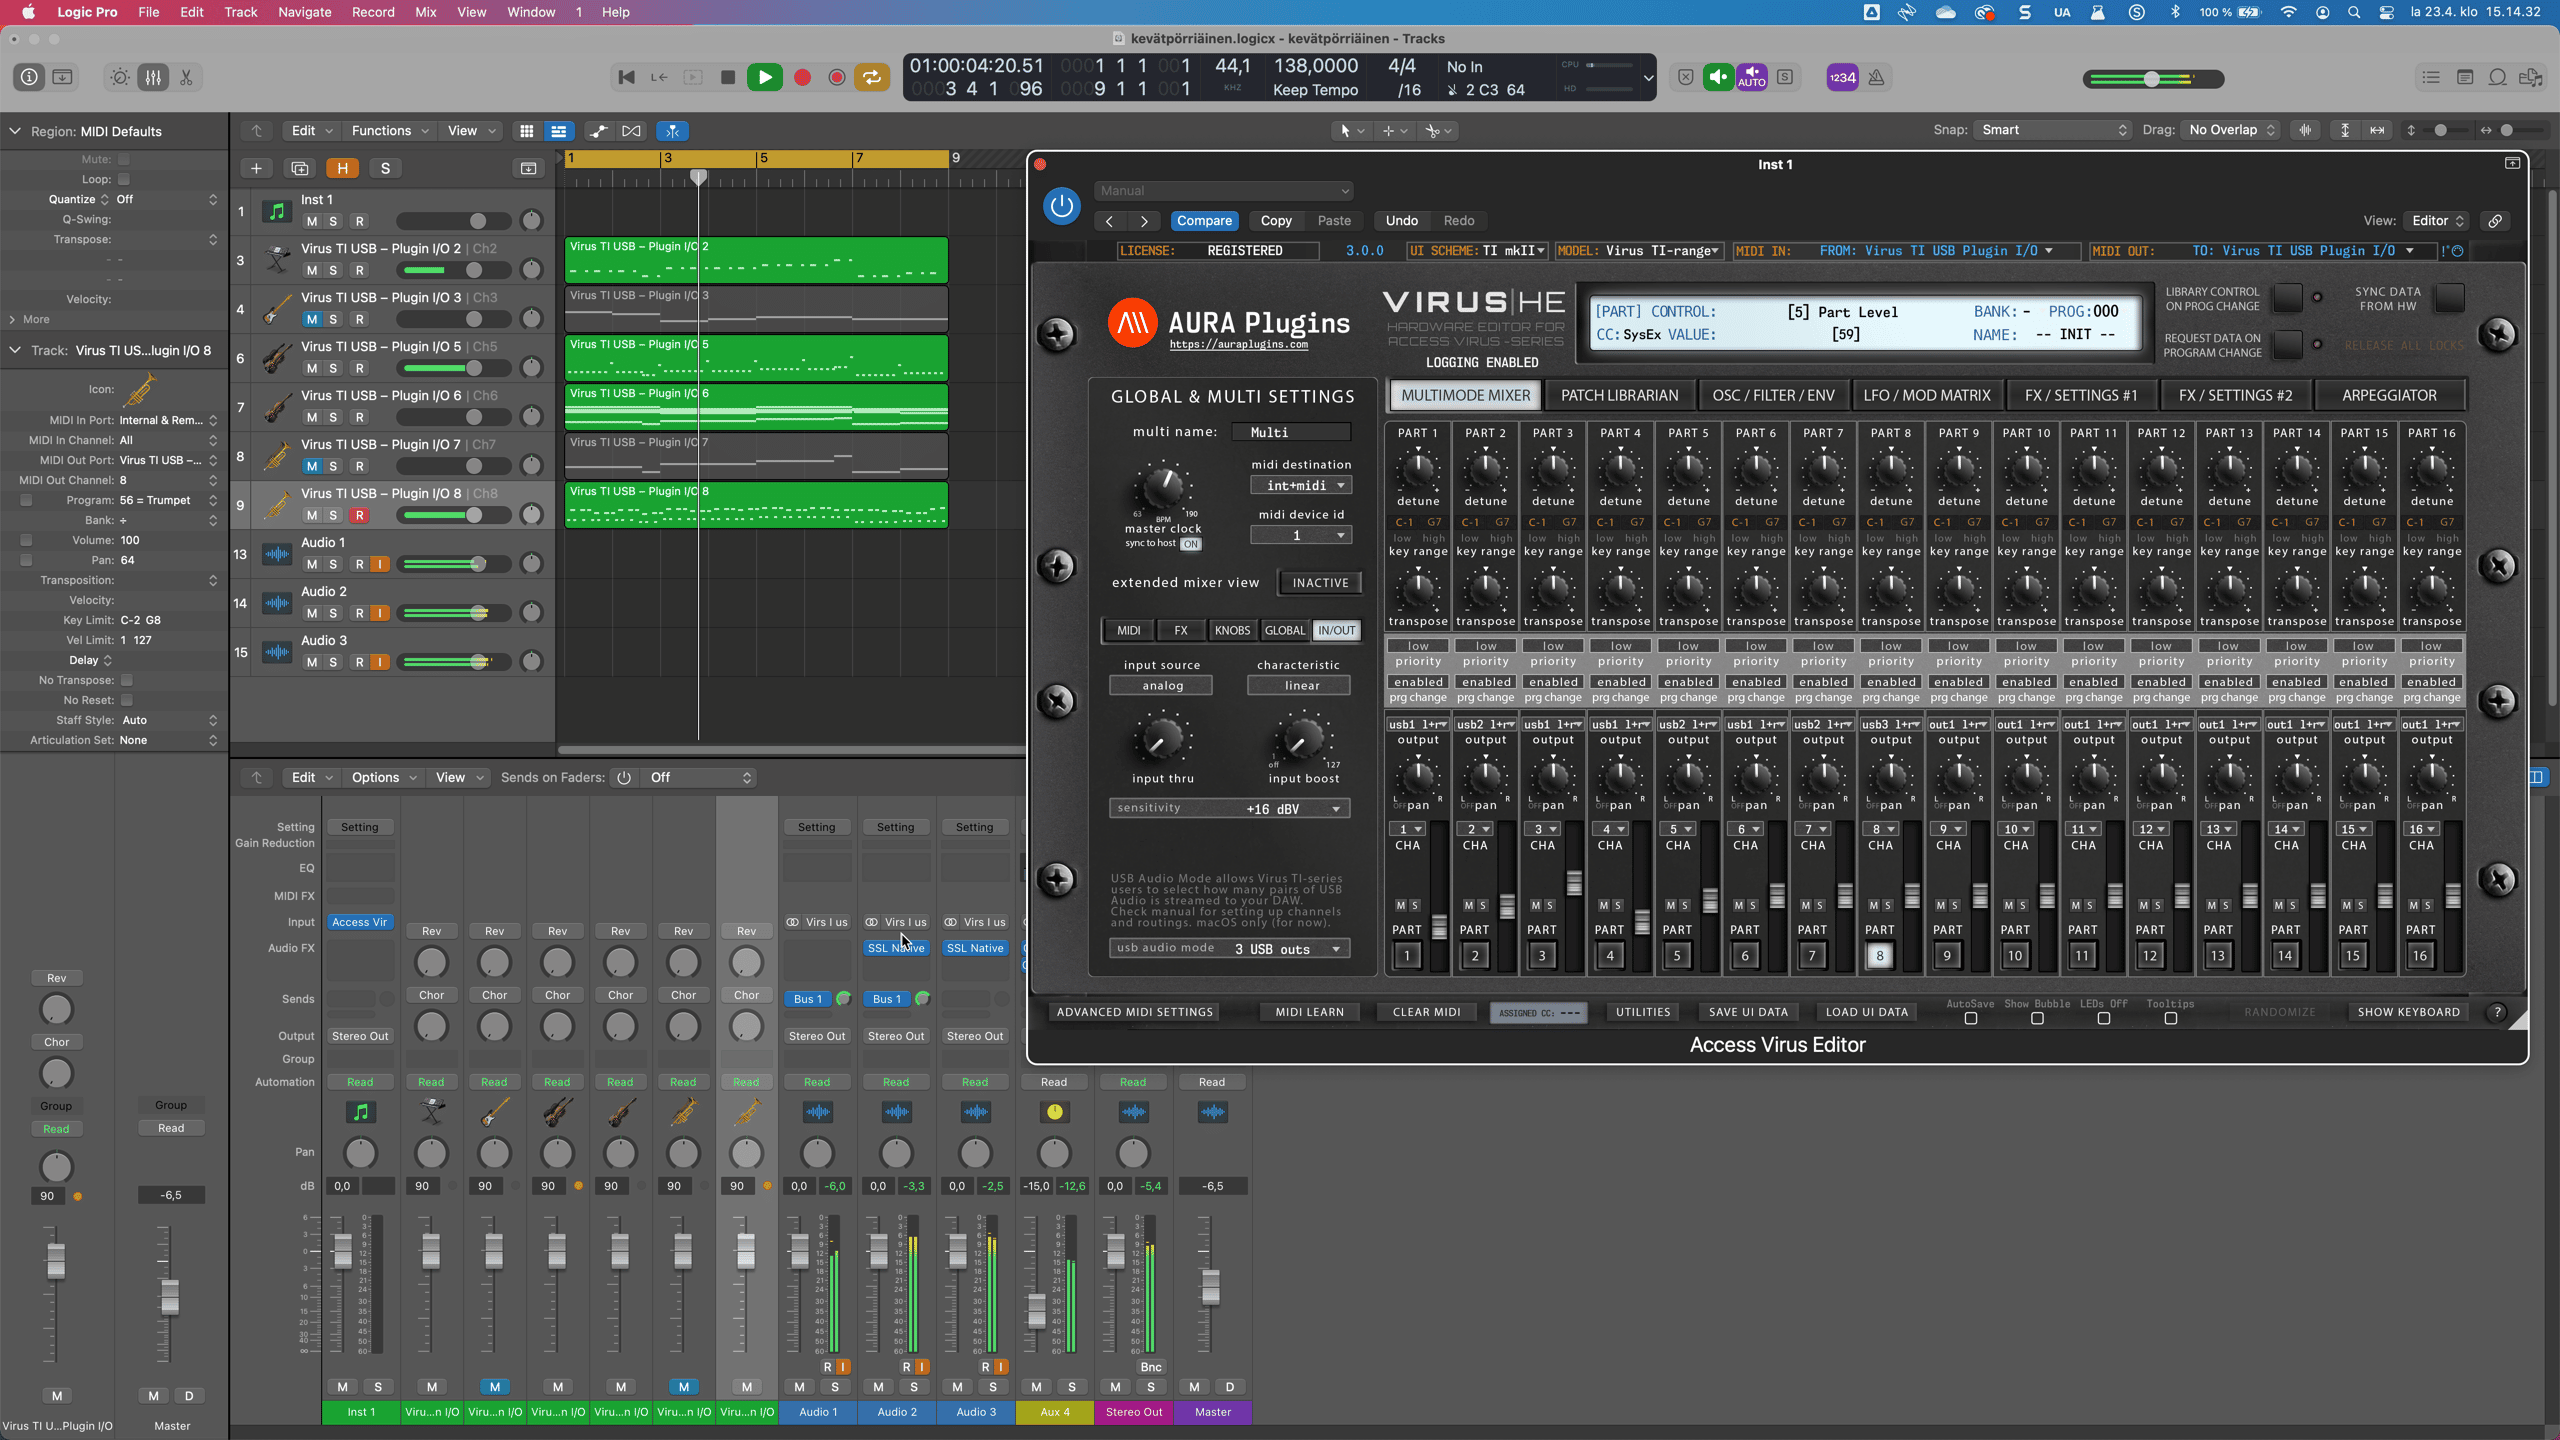
Open Logic and create a new project. Add one instrument and 16 midi tracks to it (don’t worry, you can hide unused tracks in Logic if they bother you).
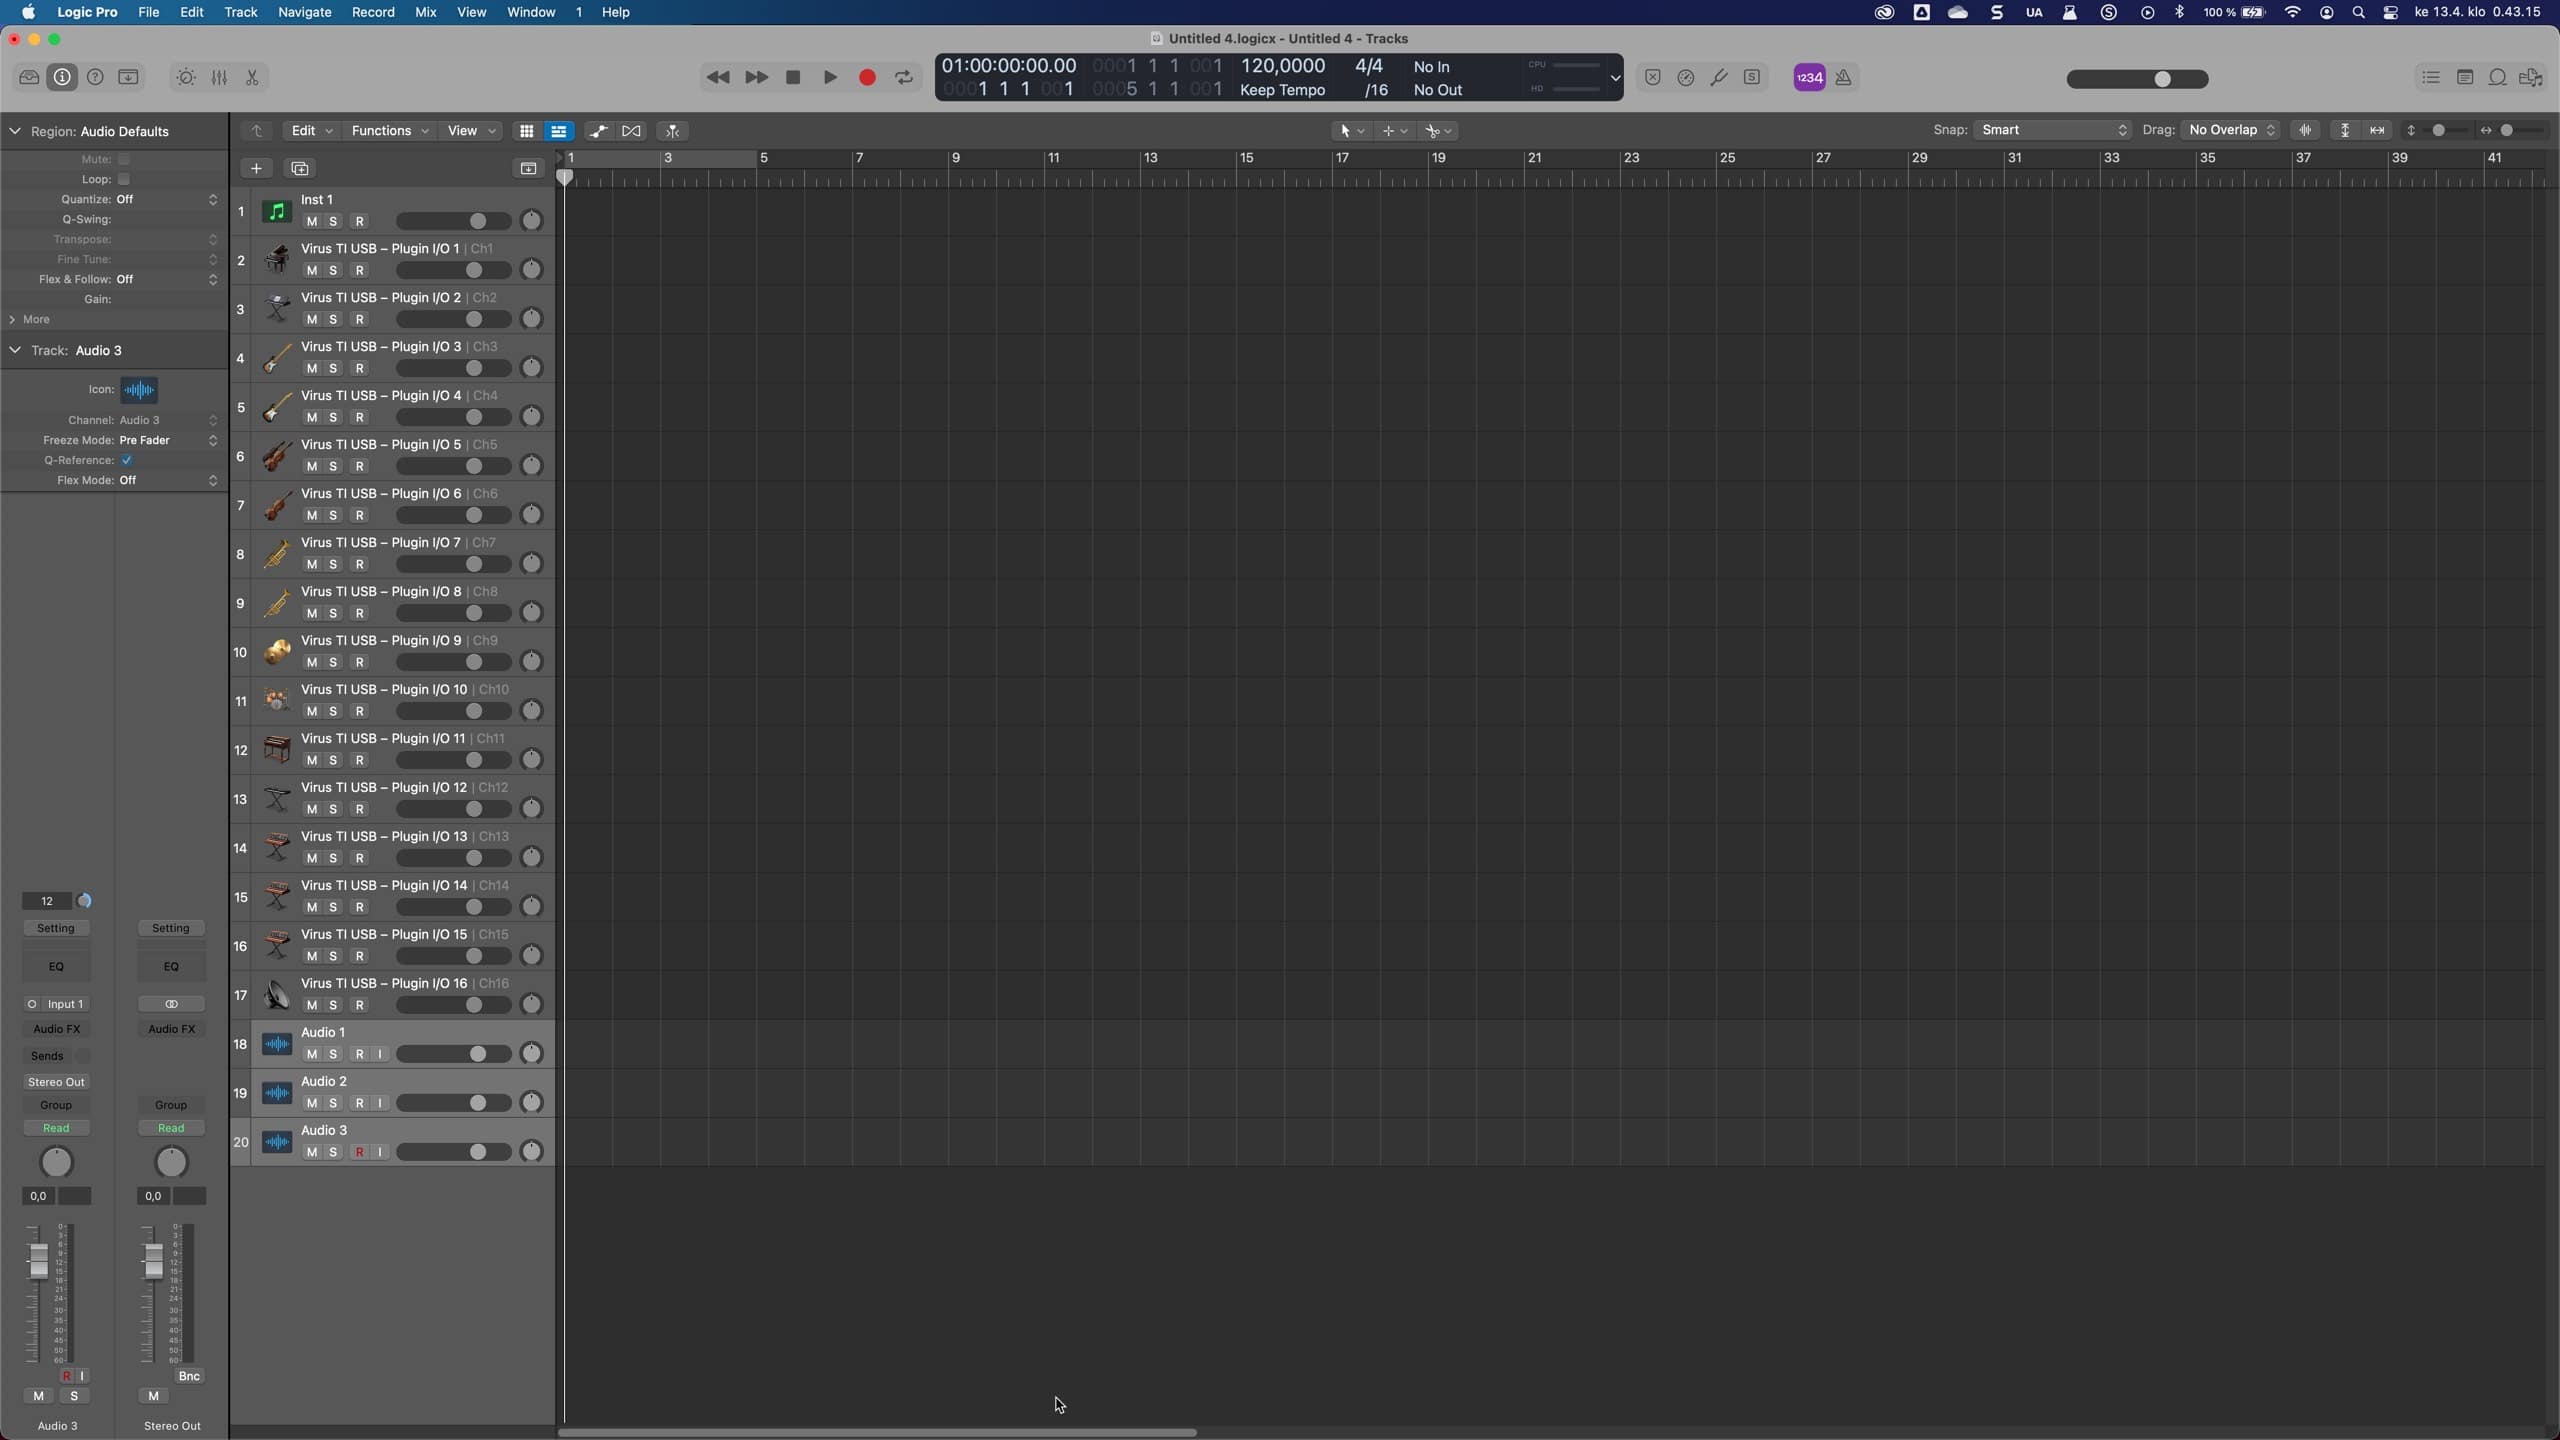
Open Logic Pro and create new tracks as per instructions
Open your DAW and open Preferences [1] where you can tweak your input and output devices used [2].
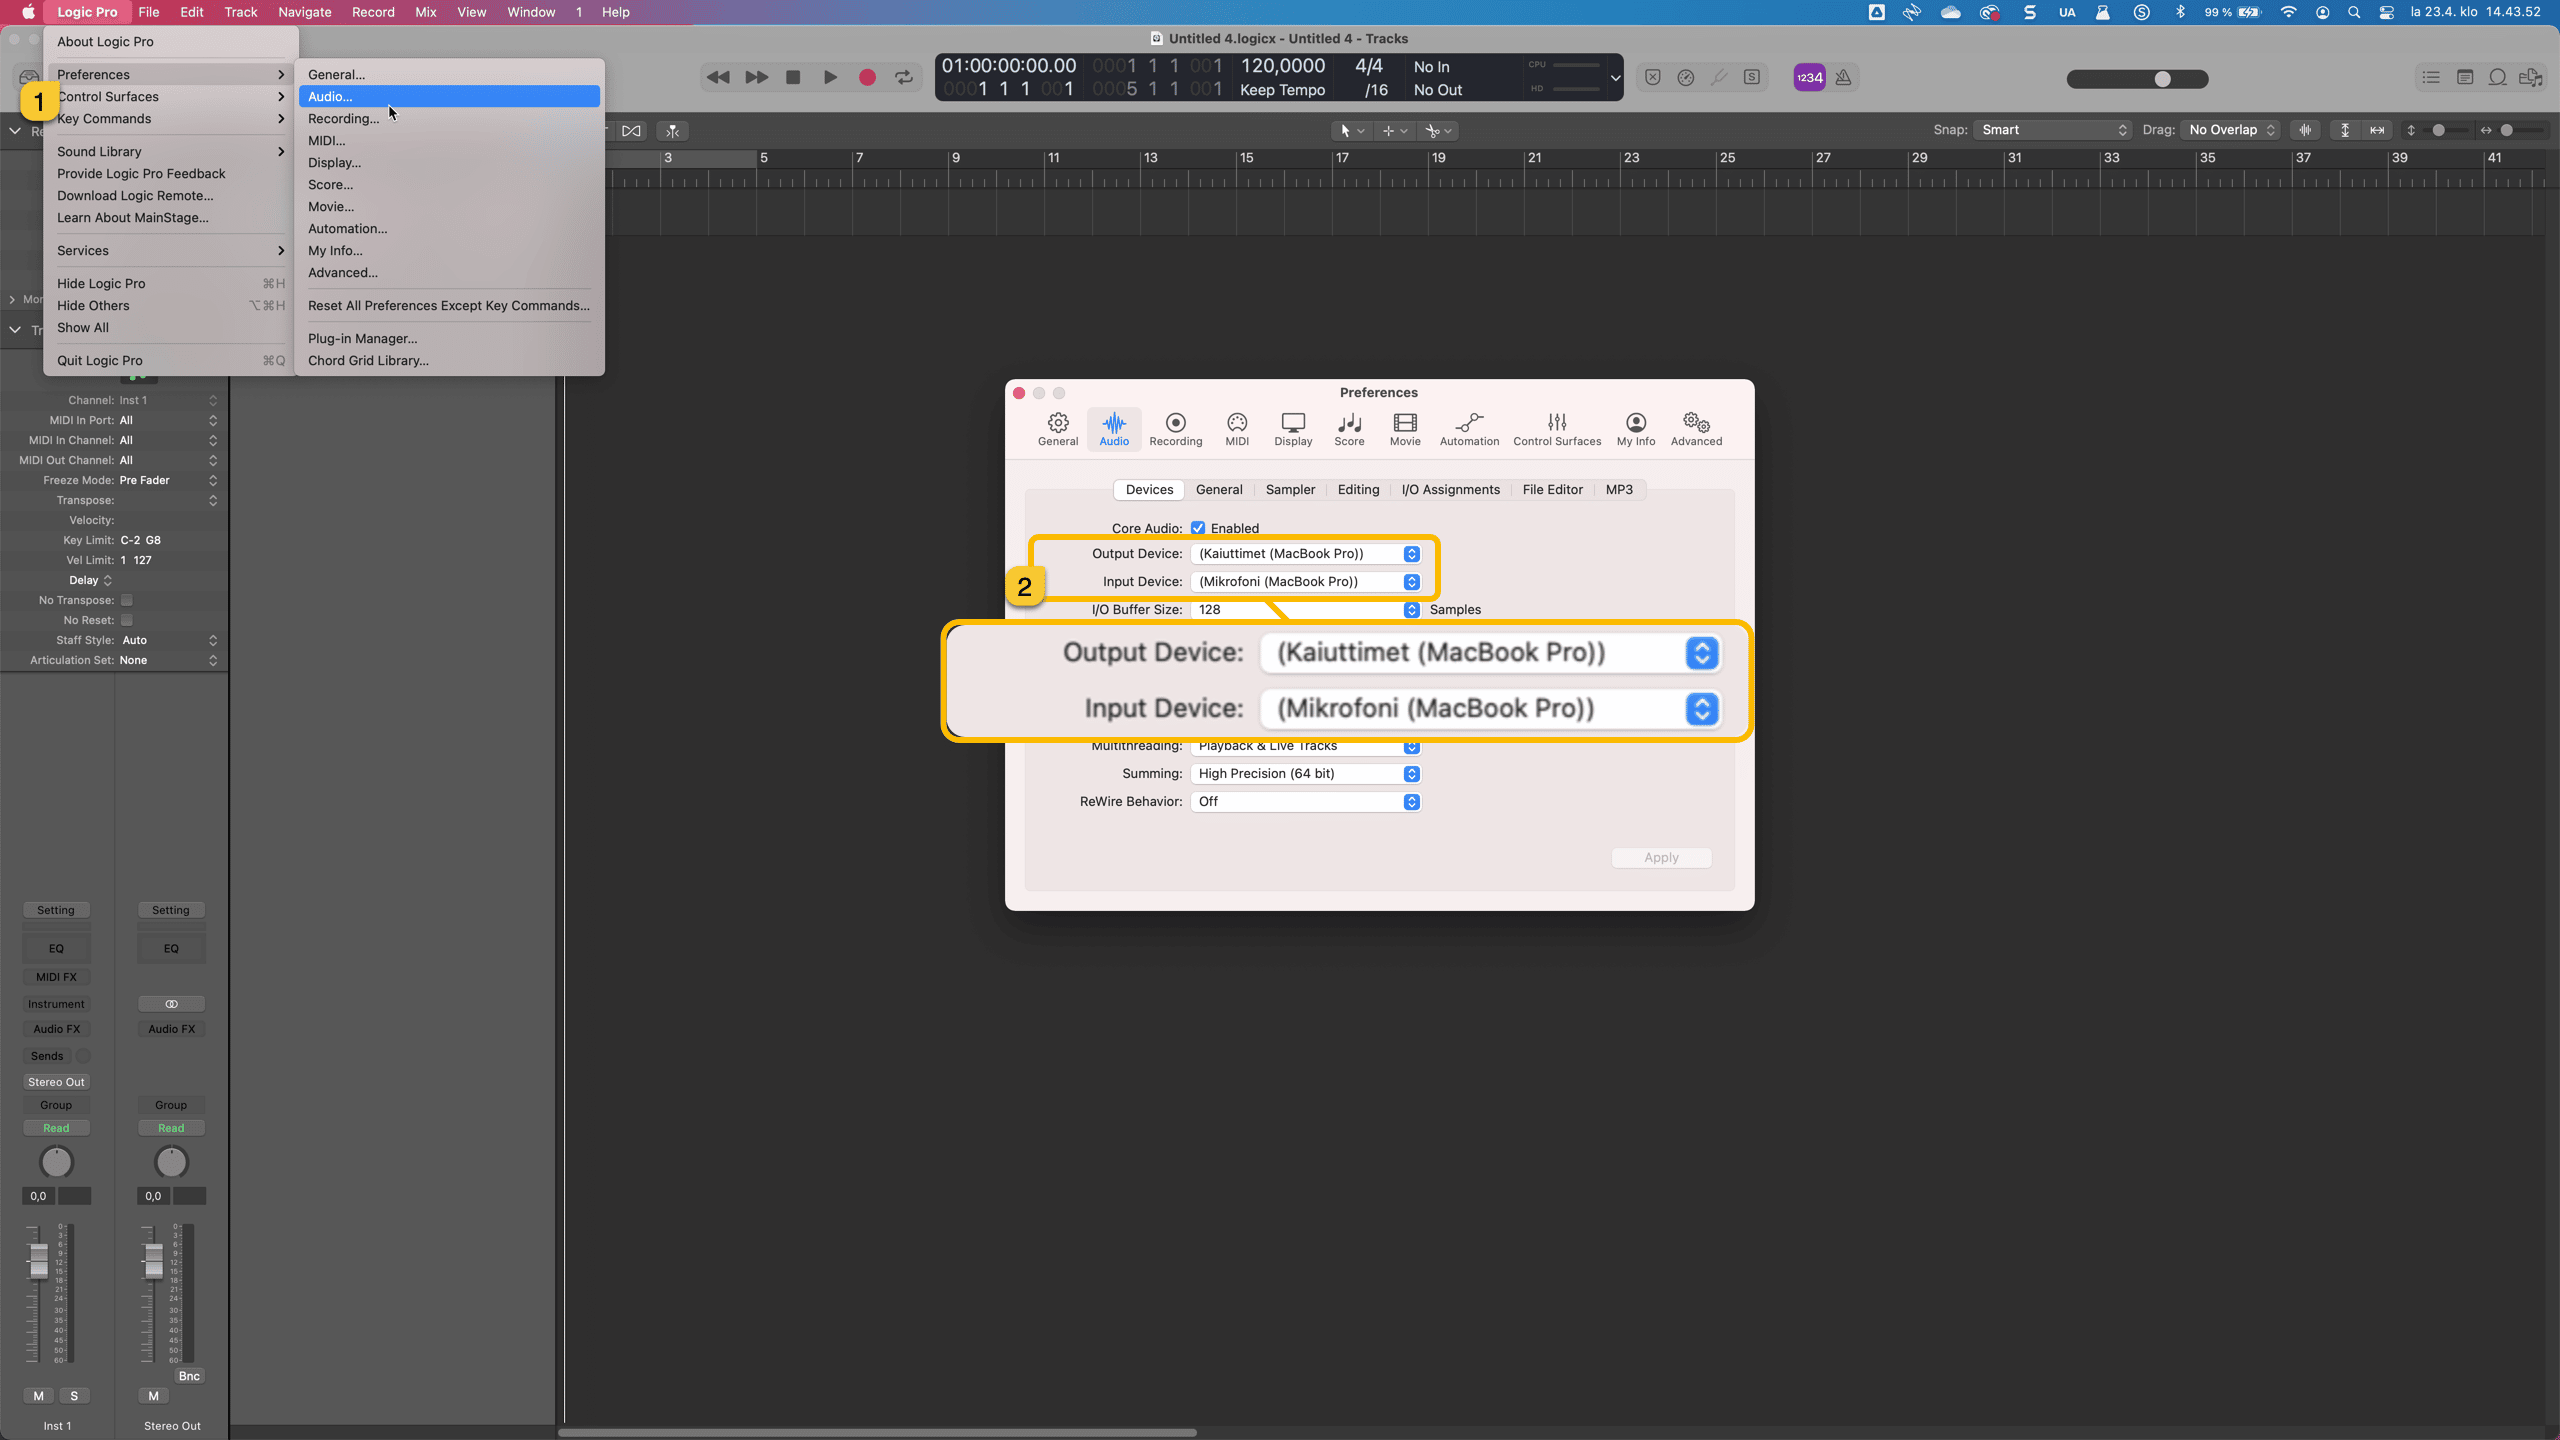
Change Audio Device to your Aggregate Device from Logic Pro Preferences
Select your aggregate device from the list and make sure it is used in Output device and Input device.

Aggregate Device set for Input and Output device
Important: Open “General” TAB from Preferences and uncheck “Input monitoring only for the focused track, and only when input is enabled (as in GarageBand)”. Also, make sure “Software Monitoring” is checked!
Click Apply and close the window. Some hosts like Live require user to define extra steps for inputs device ports enabled. Refer to your DAW user manual how to setup your Audio Devices.
Insert our Plugin and define ports
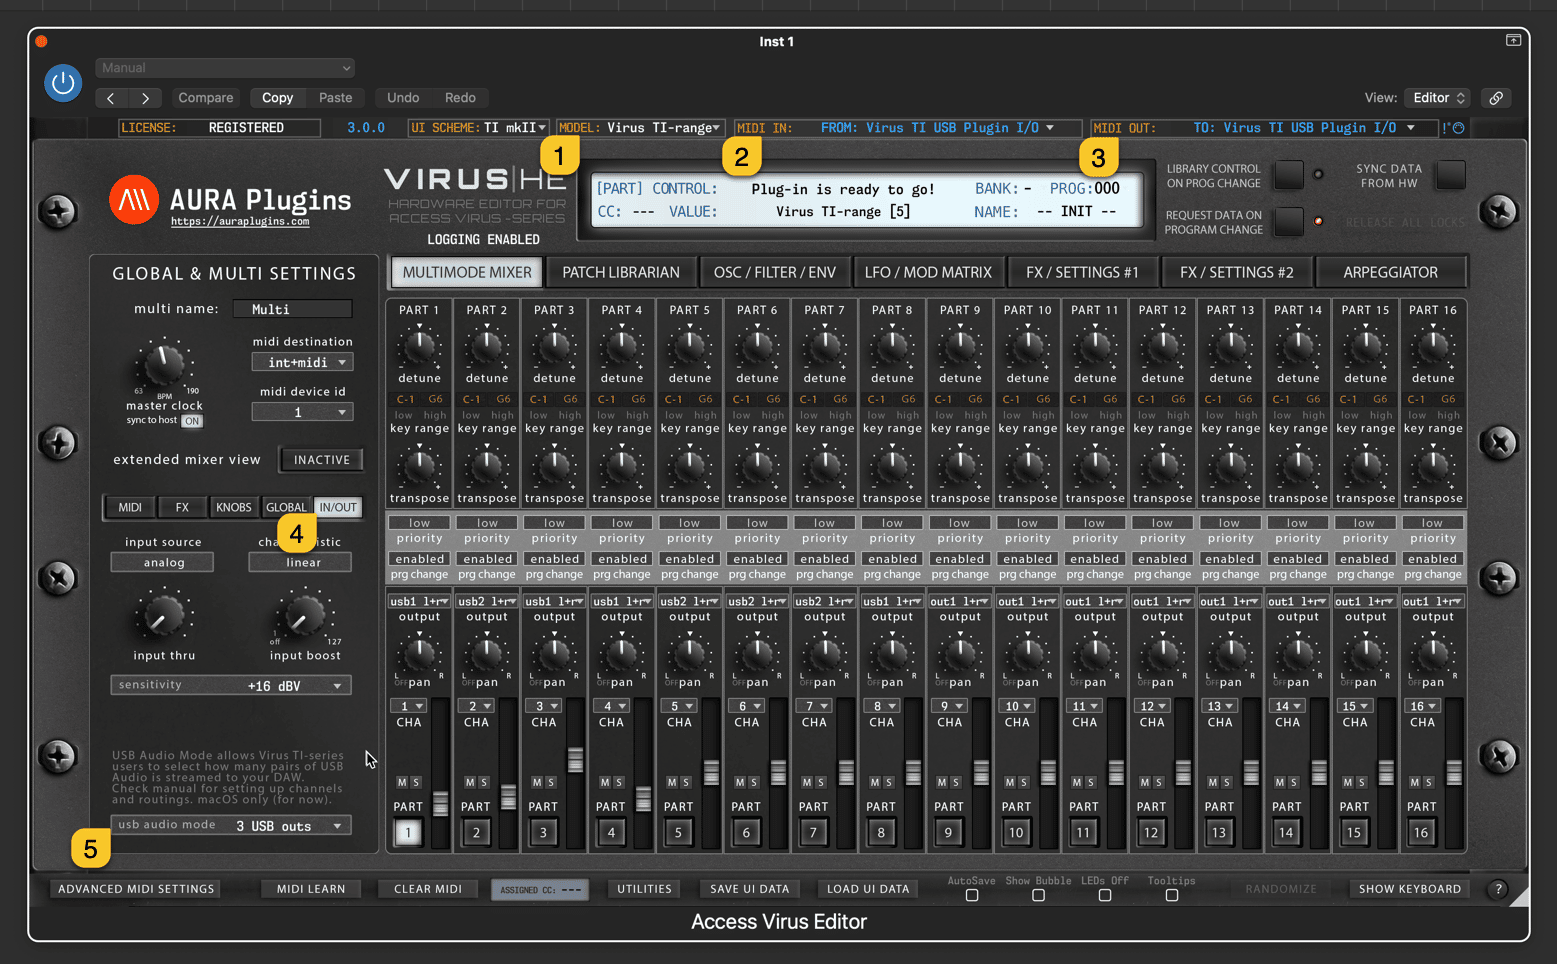
After you have inserted our Access Virus Editor to Instrument track, select your hardware model [1], midi input port [2] and midi output port [3] from the Editor interface. Once plugin is ready to go, check the In/Out tab [4] where you can configure how many USB Audio output streams Virus TI will use [5].
Open Access Virus Editor and configure as per instructions
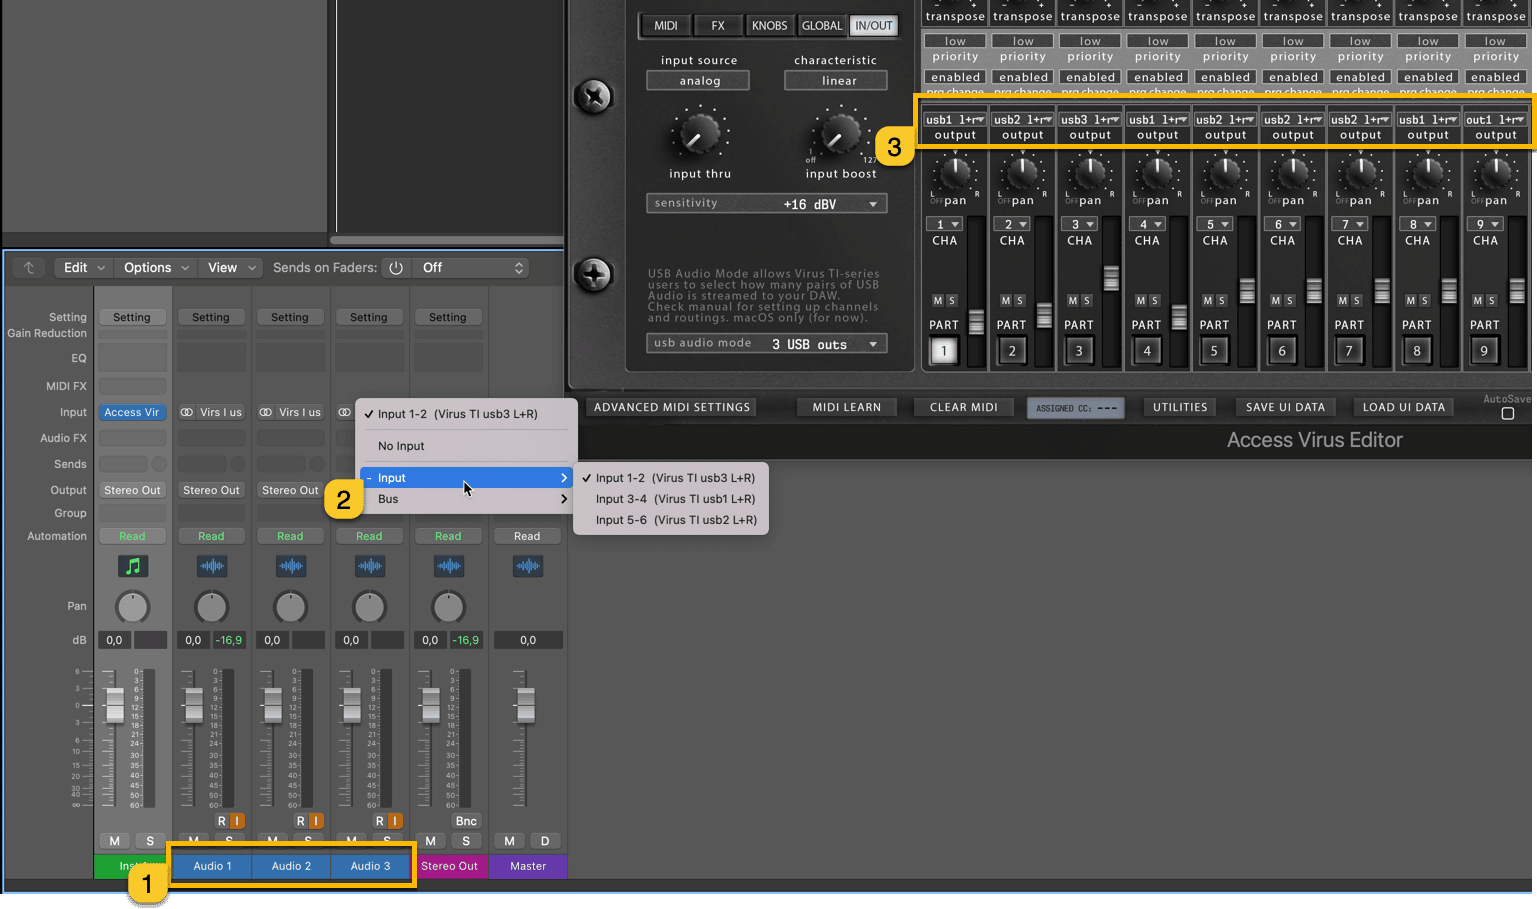
Add 3 new Audio tracks to your Project and configure Inputs for those tracks as see on the image below.
(this is how it looks in our case, your master device might be equipped with more than 3 inputs to use the last 3 pairs from your Rig to allow Audio passthrough from Virus TI USB).
Audio 1 = Input 3-4 (Virus TI USB 1-2)
Audio 2 = Input 5-6 (Virus TI USB 3-4)
Audio 3 = Input 1-2 (Virus TI USB 5-6)
Remember to enable input monitoring [1] for the channels [2] you decide to use with the editor! You can set Outputs from the Access Virus Editor [3] as you prefer.
Audio Routings in Logic Pro with Virus Editor
That’s it! Now you can enjoy using your Access Virus TI almost the way it was originally built. 6 USB and 6 analog inputs right to your DAW.
Virus TI and Logic Pro in macOS Big Sur
To get more information about how to adjust your synth, read the Access Virus User Manual.
Important: Remember to check MULTIMODE MIXER -> Part Output assignment.
8/10 cases the output has been pointing to output 1-2 which is analog out rather than usb 1-2 !
Conclusion
It was all about creating aggregate device in the macOS Audio and MIDI Setup app so that I could add the Virus TI device in the chain. Caveat is that USB connection with synth communication is VERY slow, especially when data is being requested from the Virus TI to the Editor. Overall the Virus TI USB Audio setup is simple.
Data flowing out from the Editor to Virus TI works out just fine and has not trouble timing or so.
We will be recording a video of this scenario shortly for those who don’t like to read!
Please checkout our Access Virus Editor and spread the word – Its been a long road. Stay safe and stay tuned!
Access Virus Editor Product page (requires Access Virus synthesizer or DSP56300Emulator with Virus OS) (DSP56300 Setup Guide is coming soon!)
Access Virus Editor Downloads page (logged in customers can see full downloads, guests can see demo downloads).